
This article will take you through all the different steps related to applying Polyurethane to your wooden floors, why it’s needed, what alternatives there are and anything and everything you should be knowing related to it.
We wan to make sure you always make the best decision when it comes to properly protecting your wooden floors and while they’re not being exposed to as big of a beating as your wooden siding is, because they’re inside your house and not outside, we still want your floors to retain their value and make your home easier to sell when the time is needed for that.
Thinking About Indoor Air Quality in the Process
There’s a raising awareness for the importance of air quality in our homes, and that’s also important when it comes to what you should be putting on your floors that could otherwise possibly be releasing a lot of toxic chemical compounds into the air.
If the finish you use releases a lot of toxic compounds, this will naturally have a negative influence on your home’s air quality too. It’s not just a matter of finding the finish that dries as fast as possible, which would undoubtedly be the most convenient one too, but you need to think about the health of people that will be walking there to make sure they’re not negatively affected.
Benefits of Improved Air Quality
Improved air quality has a lot of benefits in general, no matter if you’re finishzing a floor in an office, at home or at a school, and these should not be overlooked.
- It will lower your energy bill
Your HVAC unit will thank you if you take active steps to improve the air quality, and you’ll likely need to do less HVAC maintenance too as a consequence. Reduce the strain on your unit and you will see it last a longer time too. reducing your energy bill will also save you money – isn’t that great?
- Fewer allergens will mean fewer health problems too.
Sneezing, congestion, sickness and other things are consequences of poor air quality. Dust, dust mites, pollen, mold and other bad things can all have serious consequences to a person’s health and should not be ignored. What you add to your floor will also have health consequences.
- Make sure there’s the right amount of moisture in your home.
While you don’t want to have too much moisture in your home because it can cause growth of mold and bacteria, however there are also side effects to having too little moisture, which includes dry skin, and it can even cause squeaky floors too since your wooden floors will dry out and contract and then expand when the moisture level increases. Too much moisture causes a bunch of problems to furnishings and structures too, which is why moisture control is actually a thing that you should be looking into.
Better moisture control in itself can in fact also help lower your energy bill since moisture-filled air feels warmer than dry air, meaning you won’t have to heat as much during the winter.
- Improve your sleep
Good air quality is not just important when you’re awake, it will also help make you sleep better at night and make you feel more rested as a consequence during the day. VOCs can disturb your sleep and you’ll not feel as rested as a consequence.
- In schools, better air quality can increase test scores by roughly 14%.
Yes, it’s crazy how much difference it makes.
- Improving the air quality and other health-related aspects can help you retain key employees and lower the turnover.
Turnover is expensive for a business, and while some turnover is to be expected, a higher turnover will mean you are spending more money on recruiting.
- It can cause issues such as asthma.
While air quality is incredibly important at home, it clearly also is in office and school environments, as you can see which is a consideration with things that could affect your health.
How to Apply Polyurethane to Hardwood Floors
When you’ve decided to apply Polyurethane to your hardwood floors, it’s important to do it correctly to get the best results. There’s a bunch of different tools that are needed for the project that we will talk about, and we’ll walk you through the different steps of the process.
You’ll also get an idea of how much you’ll be spending on the different tools should you choose to do the process yourself.
We do encourage you to get free quotes from hardwood floor refinishing companies for the project. There’s no obligation in doing so and you will save yourself a lot of hassle going with a company that specializes in this and can get it done in a lot less time than you can.
We’ll also help you figure out if you should go for a water-based or oil-based Polyurethane finish, as they both have pros and cons.
An Important Word of Caution
If you’re staining your wooden floor yourself, you should know that it doesn’t come without a significant amount of risk as a DIY project. What that means is that a lot of homeowners will try doing it themselves to find out that it is in fact a lot harder to do than they originally thought it would be. Which is why the use of a pro is generally recommended.
Trust me when I say that DIY staining goes wrong a lot of the time when being done by the homeowner. When that’s the case, you’ll need to start from scratch with sanding the surface again to start over. Do you really want to go through that frustration?
Water-Based vs Oil-Based Polyurethane
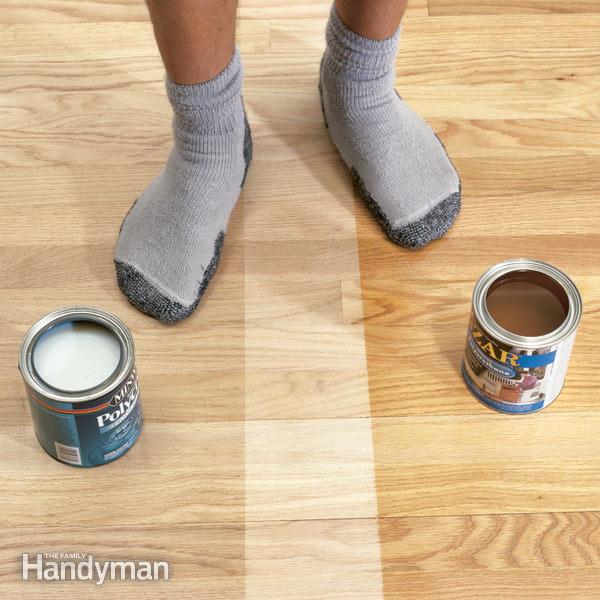
Picture credit: Familyhandyman.com
As you can see, the two finishes provide different looks. The one on the right is the water-based Polyurethane while the one on the left is the oil-based one. The water-based one is clearly more clear than the other.
Oil-based Polyurethane used to be preferred simply due to the fact that it was significantly more durable, but the water-based option has come a long way since its initial creation and now provides a hard and long-lasting finish for your floor, and if you get a good quality one, they should last about the same length of time too.
Both options, if done by a pro, will leave your floor with a nice consistent look, no matter if you use one or the other. The perfectly smooth floors is simply easier to achieve with a professional installing than with one done by the homeowner themselves.
How Long Does Polyurethane Take to Dry and Cure – Water-Based vs Oil-Based
- If you’re using the water-based option, 4 coats can be applied in the span of a day since a coat can be applied every 4-6 hours. You will want to wait no less than 24 hours after the last coat to move furniture back on to it. Bare feet and shoes should be avoided until 24 hours have passed. Pets should not be let onto the floor in the first week since their nails could damage it. The full time to cure the floor takes 30 days and as a consequence, area rugs should not be placed on the floor in that period of time. It’s very recommended that you do not do it in the first two weeks at the very least.
- Oil-based Polyurethane takes longer to dry and two coats is the maximum you can apply per day, and most will require that you don’t walk on the floor for the first 24 hours, not even with socks. Shoes and bare feet should be avoided during the first two days.. It’s always a good decision to read how the manufacturer recommends applying it and how long they suggest you wait. You should not start walking on it before 24 hours after the last coat, and it takes longer than water-based poly before you can start moving furniture back, often as much as 96 hours. As with water-based, it takes 30 days to cure and area rugs should be stored somewhere else during that time too.
- You will need to apply more water-based coats than oil-based ones. Three is needed for water-based, and just two for oil-based.
As with anything else, it’s always a good idea to make sure that you’re always following the specific recommendations of the manufacturer that makes the product you’ll be using for your project.
What Are The Curing Phases of Oil-Based Polyurethane?
There are two phases to the process. The first step is for thinners to evaporate in which the finish also becomes tack-free. After that has happened, varnish and oxygen start mixing and the actual curing starts. Before the curing is done, the floors won’t have the durable protection added by the Polyurethane. Different factors such as the humidity in the house will affect how long that process takes. The number of coats that were applied also affects the time it will take.
You can easily tell if the floor is still curing or not. Is it emitting an odor? If so, it’s not done curing and you should wait with putting area rugs back on top of it.
Polyurethane is a synthetic type of varnish material that is mainly used for finishing as well as sealing wood. For interior applications like finishing wooden floors and wooden furniture, the polyurethane used is harder and is more resistant to abrasion as compared to its naturally derived counterparts.
Moreover, polyurethane is cheaper and easy to use and it comes in a wide range of finishes, allowing you to choose from glossy to matte finishes. The steps are straightforward and easy, especially if you are someone who is an expert with DIY home improvement projects. It only requires the use of some few tools and will not take up a lot of your time.
Advantages of Oil-Based Polyurethane
The oil-based Polyurethane does have some advantages that are worth mentioning that you should know about.
- It provides a look that is preferred by some homeowners.
There’s more depth in it and it also shines more which is what a lot of homeowners are looking for.
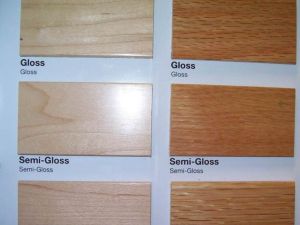
As you can see from the picture, the oil-based product is significantly darker and it is what we have come to think hardwood should look like.
- It has traditionally lasted longer too, although that is not necessarily the case any more.
When a product lasts longer, you also won’t need to do it as often. The higher level of VOCs in the product helped give it a lot of its durability, while VOCs aren’t exactly good for your health.
- You will end up spending less money on material since it’s cheaper.
If you’re on a budget for this project, a lot of homeowners simply choose to go with the oil-based product because you’ll alternatively be spending up to 25% more as a consequence, which does not sound appealing to everyone.
- The oil-based poly darkens over time
This can create a richer and even better looking floor too. When a dark look us desired, that is simply not something that you will get the same way by putting water-based poly on your floors, and it definitely changes the ambiance of the room it is installed in too.
Water-Based Polyurethane and its Advantages
When all the good things about oil-based have been said, it’s important to emphasize that water-based Polyurethane also has clear advantages that make it a worthy contender.
The Shorter Drying Time
If you find it highly inconvenient to have contractors running around your home, that won’t be as much of a hassle when you’re installing the water-based Polyurethane as the oil-based one. It simply dries faster and even if more coats need to be applied, you can generally get the job done in as little as 2 days. As you saw from the drying times previously mentioned, you’ll also be able to walk on it sooner, which is undoubtedly convenient if you’re staying there while the process is ongoing.
Oil-based jobs will take longer, from 3-5 days. If you live in a very humid climate, the latter. When you have to run a business that needs to get back up and running as fast as possible, you might not want to stay closed for that long. If you do, you’ll be losing the sales you would otherwise be generating in that period of time.
No matter if you’re doing one or another, if you’re planning on using a contractor for the project, it makes a lot of sense to try and get it done at a time when it will inconvenience you as little as possible.
The Odor
If you live in a co-op you may not even be allowed to use oil-based because of the smell that it has since it might annoy neighbors. If you’re living in a normal house, your neighbors will be too far away to be affected by the smell either way. Both options have an odor to them, water-based has less.
Less VOCs in The Product
Water-based Polyurethane contains fewer VOCs, which makes it more environmentally-friendly. The product is not without VOCs, just fewer of them, and that has a positive effect during the drying and curing process. Once it’s done curing, there will not be a difference.
Certain Types of Floors Absolutely Require that You Use Water-Based
Some types of floors will look a lot better with water-based Polyurethane than oil-based and those include white-washed, gray-stained and natural maple hardwood floors.
Maple – if you add oil-based on top of it, you will see how yellow it ends up turning up over time. When it hasn’t been stained, you’re definitely better off going with the water-based option.
Gray-stained floors – whenever you add oil-based poly to floors, the yellow and amber hues will only be emphasized over time, which is not what you will want with a floor that has been white-washed or gray-stained. An option to consider for these floors is the Bona Traffic product because of its durability.
Avoid an Orange Feel to the Floors
Some people on the internet complain about oil-based floors ending up looking yellow over time, which won’t be a problem with water-based.
How Many Coats of Polyurethane Do You Need For Both Water-Based and Oil-Based?
The water-based Polyurethane coats are thinner than the oil-based ones, and given that they have previously been known for being less durable, how many coats should you actually be using? Since each coat adds a protective layer and you have parts of the house that have more traffic than others, these will also need more layers of coating than others. Your kitchen, family room and entryway take especially strong beatings.
In order to get a smoother surface, if you’re using a water-based solution, you need to add no less than 3 layers. 2 layers can simply make the floors still feel rough to walk on.
Preparing the Area Before Applying it
By now we have taken you through the different aspects of choosing the right option for your floor and some of the things that you need to consider.
You should start off by knowing some important aspects to ensure the best possible results from the work. First of all, you shouldn’t shake the material which could mean small air bubbles end up on your floor. Instead you can stir the can. It should also be applied in normal indoor temperatures, where it should be kept until it is done curing to give it as much possibility as possible to be installed undisturbed. You also want the space to be well-ventilated but without there being any doors or windows as this would mean dust ends up getting in also and get stuck on you’re drying floor. Only open the windows and doors after a day, which in turn can help it cure faster.
Tools You Will Need to Get Ready for the Project
- Exhaust fan
- Masking tape
- Vacuum
- Respirator
- Lamb wool applicator
- Orbital floor sander
- Mop
- Split-flex tubing
- Sandpaper – 120 ad 150-grit
- Pole sander
Those are the tools that you will need for the project, and in order for it to be applied as effectively as possible, you will need to prepare the area the same way you would if you were painting your house. With a well-ventilated house, you’ll be safer, but the ideal solution is to wear a respirator to keep yourself from inhaling the fumes.
If there are any spills that happen, you will need to have something at hand to remove them with, which is where old towels or newspaper comes in handy. If you don’t make sure to deal with spills immediately, fixing it afterwards will be nearly impossible. The longer it has to dry in the spot it’s in, the more likely you are that it will leave an unsightly spot as a consequence.
Sanding the Floor Before Proceeding
You will want to make sure to sand the floor before giving it a new layer of Polyurethane to make sure you’re starting from scratch. Even if there’s no finish currently on it, sanding it will ensure a smoother surface that will give a noticeably better result when you’re done. Even if it’s unfinished, there are likely things on top of your floor that would make the finish less nice such as dust and other small irregularities. While sanding removes these things, it will also ensure the the Polyurethane sticks better.
Wipe the floor with a clean cloth after you are done sanding it to make sure it’s clean. No dust or wooden particles should be left on it before you start applying the product. The cleaner your floor, the better the end result.

Prepare the Polyurethane
You will now want to stir the can of Polyurethane, and although you want to do it thoroughly, it should be done gently with a stir stick. Vigorous stirring will have the same effect as shaking the can – air bubbles may form in it. Make sure to study the can to see if there are any specific indications as to how to use it.
Begin Applying it
It’s now time to actually start applying the polyurethane material. Use the lamb’s wool applicator for this and load it with the material. Brush with the grain and back-brush the material by moving it from the wet edge to the wet finish. Don’t do ti in a stabbing motion but rather a nice and gentle one that ensures that no marks are left on the floor. While it’s very hard to completely make sure that no undesired marks are left at all, a more continuous motion will limit the unsightly marks significantly. Marks may become visible where the brush landed and where it was lifted from. Brushing in fewer, more continuous strokes will limit the amount of these marks. If you do it like this, you’ll likely not leave many noticeable marks.
It’s also important that you don’t get drips, or you’ll need to make sure to remove them.
The excess Polyurethane should also be wiped off against the rim of the can to ensure you’re only having an amount of material that can meaningfully be applied. The strokes should be long and slow so as to get the best result, and it obviously should be done evenly. Don’t brush over the surface as it has started to dry. Follow the instructions with regards to waiting time before applying the second coat.
It might sound counter intuitive, but in order to have the best results, you will now need to sandpaper the floor again. While you don’t want to take off the previous seal, doing this will actually make the second layer stick better. Sandpaper with 400 grit is what you’ll want to use. It obviously shouldn’t be the extent of the first time you did it and once again, you’ll want to wipe the floor to remove dust.
The second coat is then applied in the same fashion as the first one. Apply additional layers in the same manner as the second. When you have added the last layer, you will not want to sand that as nothing is going on top of it.
Helping the Polyurethane Dry Faster
While it is very recommended that you wait the necessary time before you go in and start doing things in the space that has been worked on, you can do a couple of things to help the process move just a little bit faster.
While you can’t open the doors immediately after it’s been applied, you can still make sure it’s well-ventilated. Get a fan to help it go just a little bit faster, the same way that clothes will dry faster when there’s more wind. Don’t do the mistake of bringing in a temporary heater. You want everything to be done as evenly as possible, and a spot-heater could cause it to be less so.
If you’re deciding to raise the temperature, it should be done across the whole house. It’s crucial that you don’t start moving things in before it has had enough time to dry as per the recommendations of the manufacturer.