
If you’re someone who wants to have faux brick walls in your living space, you’re right on trend. This easy and simple solution is great for those who are renting a place and can’t damage the walls, or those who just don’t feel like ruining the foundation of your home to build brick walls from scratch, talk about costly! In this guide we’ll walk you through everything you need to know when it comes to creating DIY faux brick walls in your space. We’ll show you the simple tools you’ll need to be able to create something on trend that will turn into something timeless. A simple addition of a faux brick wall can make a statement in any space for a cheap cost. You will easily be able to create this project in a timely matter and you’ll even have two different choices that we’ll be going over when it comes to different methods you can choose to follow. The first method focuses more on a removable wall that’s lightweight and will easily be able to be moved if needed, which is perfect for those who live in an apartment or rented space. But if you want a method that’s more permanent and is there to last without the risk of furniture damaging it, then you’ll most likely want to try the easy plaster route, while it is a bit messy it’s well worth it!
Faux Removable Brick
A faux brick wall, like we mentioned before, is the perfect solution for those who want a less damaging option for this project. You won’t have to nail anything into the walls or damage the wall that this option is built for. This method is very simple and just takes a bit of time and repetition to get the finished project. If you decide to go with this method, you won’t have to worry about messing up because even though it is time consuming the materials are very forgiving and it isn’t hard or expensive to start over on a panel if needed. Just make sure you pay attention to the measuring so you can really make a tight fitting pattern for the wall you’re going to create the panels for. If the measuring off it will be very difficult to place the walls without it looking like it was a cheap DIY. You want to make this project conceivable and as realistic as possible.
Make sure you start this project in a large space, but before you start on the panels, be sure that you can fit them into the space they will eventually end up in, so you aren’t tasked with trying to figure out how to make them smaller and end up messing up all of your progress.
What You’ll Need:
- Pencil for marking.
- A 2 x 4 piece of wood.
- Acrylic or latex paint.
- Sheets of Styrofoam insulation, like these.
- Small welding kit for plastic.
- Saw.
- Utility knife of two varying sizes.
- Paint of your choice.
Steps:
- Your Base
Start off with a large piece of styrofoam insulation, this will serve as a strong base for those who want to be able to remove the faux brick wall when they have to move. This is a great way to make accent walls quickly for a very low cost of about fifty dollars a section. This way you’ll be able to easily cover the wall without any mess or damaging the property. Cut the sections out of the material so it fills the wall perfectly without any gaps or seams. For most average sized walls it can take up to three or four panels. We suggest that you keep them as large as possible so you won’t have to worry so much about securing them in place which could make it look messy.
- Sketch It Out
Once you have your panels measured, start brainstorming what you want your brick pattern to be. Take a straight edge and a pencil and lightly measure how big you want your bricks and how you’d like them spaced. Keep the pattern constant and perfectly measured so it looks consistent. Also make sure that you line up all your measured panels on a flat surface so you can keep the pattern nicely spaced from each piece in the order that they will be going on your wall. The lines don’t have to be perfect as long as they are generally the same since we don’t want it to look too perfect and fake. Take your time to really make sure that you’re trying to be as clean cut as possible. A little mistake here and there is fine, but when using this method it looks more realistic when you take your time and follow your guidelines. Also pay attention to how deep you want your lines to be, this is very important for the shadows and light play that will make this method that much more believable.
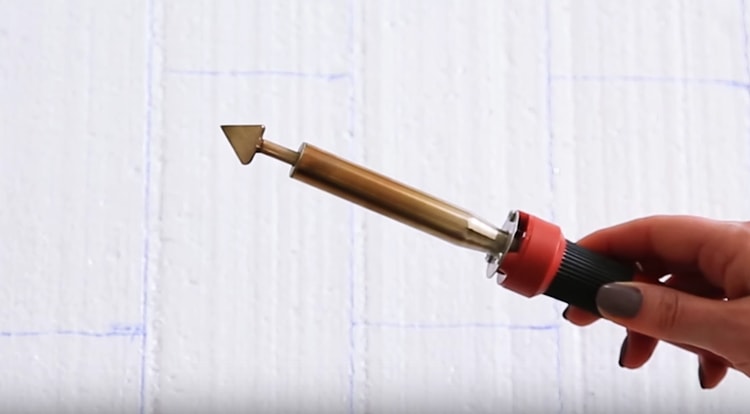
- Weld Everything
Carefully take your pieces outside or to a well ventilated area and use your small welding kit for plastic. Use this tool to go along each of those lines that you made for the brick outline. Slightly push into the material but be sure that you don’t melt the material all the way through. Keep a steady hand and make sure that you follow the outline as closely as possible so you can have a very even and flowing design throughout the panels you have to work with.
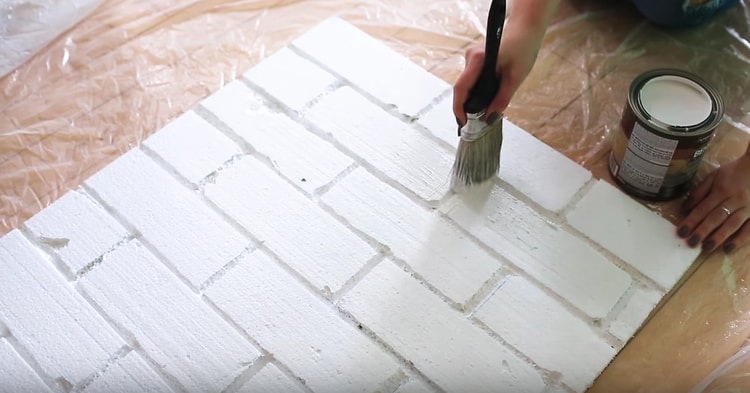
- The Details
Now that all the grooves have been made in the panels, you should have something that looks like a very plain white brick wall, but it might not be completely convincing because there are no highlights and shadows, no detail! If you want to keep it simple, focus on washing over each surface of brick with a light grey, lightly tap a paint brush in some areas for small worn looking details. If you want to keep your brick looking white/grey, then this is the perfect route to take and one of the most simple. But if you want to focus on bringing some color onto your accent wall, try to focus more on how you can wash the whole of the panels in your desired color, most commonly a rusty red, and go over areas with a darker brown color for achieving that more worn and realistic look!
If you want to discover more ways to highlight a chic faux brick wall, there is some amazing inspiration from this article that goes over all the unique styles of interior design for a cheap budget! In this article we go into detail on how you can live in a stylish environment without breaking the bank. Our favorite style from this list encompasses the industrial style of interior. WIth exposing rough brick walls it’s the perfect balance between rustic and modern. “If you’re in a space that naturally has brick, wood, or concrete, you have a start on the design process that you won’t have to shell out thousands for to cover up or complete. When you walk into an inspired industrial space, you’ll notice right away the warm feelings, the warm wood tones, the neutral colors and the abundance of natural light. Pair that with high ceilings to really open up the space along with metal accents, you’ll have an area that’s simple yet refined.” If you want to create an industrial area, a statement faux brick wall is a great way to do so. Regardless of if you paint it white and grey or the blassic rustic red and worn areas of brown. Whichever way you choose to go about it, it will be a highlighted area of your loft and a project that is well worth it when you step back and view the completed project. Just remember to not let the repetition bother you, don’t let it influence you to rush and finish, pay attention to the details and take your time.
Alternative Plaster Route
We’ve also included a second choice when it comes to this lifestyle DIY. If you are living in your own house and you want something more stable, realistic, and detailed, going this route is perfect for you. This version of the DIY is more simple but it is also much more permanent. The alternative plaster route is a process where you use plaster to create texture in a wall and then hand make the grooves to create a realistic looking brick wall. This is the perfect choice for those wanting to make a more permanent accent wall and it’s ideal for larger spaces because it will be much cheaper in the long run for a bigger space.
This method is perfect, because now you won’t have to worry about the wear and tear and it will generally last much longer. If you want a much more realistic option and can ruin walls of your home, this will be the option we suggest for you. Keep in mind once you start it will be hard to turn back and get the plaster substance off your walls, so make sure you’ve really thought out what you want the overall space to look like. Try to even create some mock up designs by placing furniture how you would when the wall is finished.
Don’t forget to be patient either, just like the above method, it’s important that you don’t let the repetition of this project get to you. Be as detailed as possible and go in sections like you’re supposed to, don’t rush the process because if you do and end up with a sloppy end product it will be very time consuming and difficult to fix. Just make sure you’re sure that you want this specific wall to the be highlight of your space and don’t rush!
What You’ll Need:
- Plaster or joint compound.
- Water.
- Gloves
- Trowel
Steps:
- Decide what amount of supplies you’ll need
Before you get started you need to figure out what wall you will be making your faux brick wall for the accent of the room, and you’ll also need to figure out an estimate of how much material joint compound or plaster you will need. Usually you can purchase one 4 gallon bucket of joint compound and it will fill most spaces with an abundance left over for other projects in the future. Make sure you have a bit extra incase you need to go over a mistake as well! We suggest that you choose a wall that is a highlight of the space, something with natural lighting from the windows and can be the center of attention. While every space will be different in terms of the size, shape and what you’ll need for your particular and unique project, we will suggest that you purchase a bit extra than you think you’ll need because it’s better safe than sorry. If you start this project and run short, it will only cause frustration and interrupt your complete flow that you got into when you started getting use to what you needed to do.
- Map out a rough draft of the bricks
Take a moment to sketch out the wall and figure out your measurements for each brick. Feel free to eye it if you’d like because during this process it will be much easier to retrace your steps if you find that you’re unhappy with the size of your bricks. Take a piece of paper and sketch out a diagram so you have a good idea of how you want to tackle this project. If you need to take measurements of the wall as well, that could also be a help so you can scale down the wall on paper and really create a rough sketch that will help you along the way as you focus on your pattern and the size of the bricks you want to have. If you have a wide open space we would suggest that you choose a medium sized brick. If you have a very large space, choose a larger brick like the size of a cinderblock. And if you have a small space, stick to small bricks to open up the space. Choose what looks best to you and what will make you the most happy in the end.
- Start In Sections
Because plaster and joint compound dries quickly, be sure that you map out the wall in sections. Start by covering a small 3 by 3 foot of space and leave enough room so that you can have enough of a guide to go on when you start on additional sections. While this might take up some time, you’ll be surprised at how easy this will make the overall process. When you begin this method in sections you’ll be making sure that you will have enough time to really pay attention to the important details of the wall, without having to rush, which could make the whole project look sloppy. Find your pace that you can work well with and always make sure you give yourself enough space so you can make sure that you’ll be able to continue the brick pattern flawlessly.
- Use Your Hands
You don’t need some fancy tools to get the material on the wall. To keep that rough texture like a brick wall we suggest that you just go in and use your hands with a pair of gloves. While it might be a bit messy, it will give the appearance of brick and not some perfectly smooth faux wall. This will give you the right amount of texture to work with when going into the paint detail step of this process. Be sure to wear some gloves if you rather not make a mess! When using your hands this is a great way to create unique texture that no one else could replicate, even if they did the same DIY.
- Smooth Some Sections
By using a trowel you can smooth over some of the sections to give the area a bit more variety when it comes to texture. This will give a great balance when it comes to the type of look you’re going for. This is a great method for those who want a very realistic brick wall. Make sure you go in sections so you have time to really pay attention to the important details you won’t be able to change if the plaster dries to quickly.
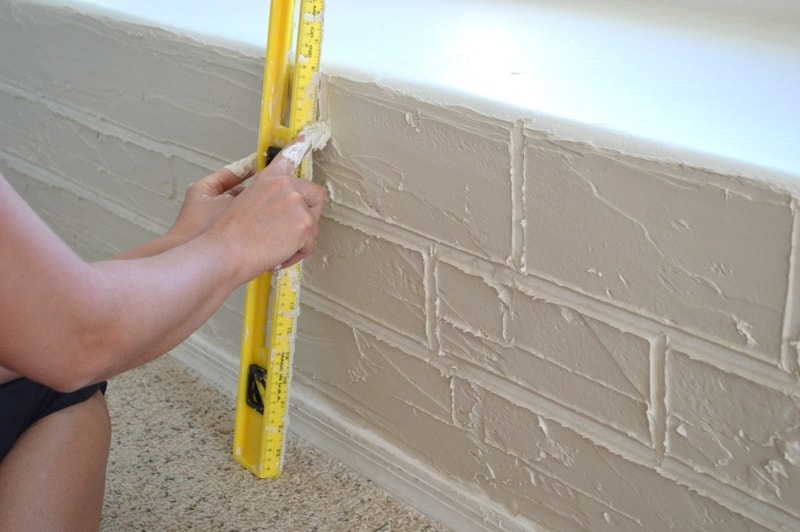
- Use a level to draw lines with your fingers
Carefully line up when you finish plastering each individual section before moving onto the next, use your finger to trace lines along the guide of the level. This will give the impression that there are spaces between the bricks like an actual brick wall. This is the finishing touch when it comes to the messy parts! Make sure that you keep your level in place and have an idea in mind when it comes to the sections so you can easily continue the pattern when you start the next section of plaster. Make sure you keep the lines as straight as possible, but if they aren’t don’t worry, it will just add to the overall realistic look of the wall when things aren’t perfect.
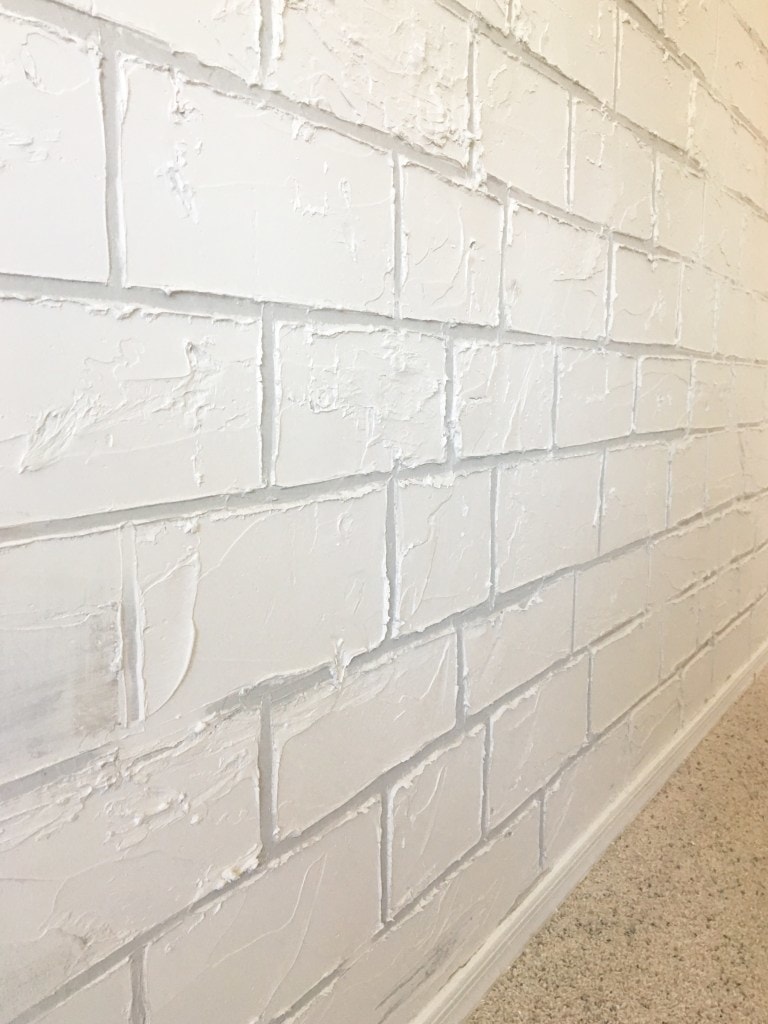
- Use a “Varnish”
Paint your wall to make an even bigger statement. Our favorite is to use a similar technique as the one mentioned above in the first walk through. Use a stipple paint brush to gently swipe some grey paints like a wash over the texture so it only watches on raised areas. This will give a more realistic look to the wall and it looks perfect for a shabby chic inspired space. Check out this article if you want to learn more about the shabby chic aesthetic, here is a brief excerpt as well: “Shabby Chic is a very soft take on the bohemian trend. Whereas the bohemian trend tends to be anything goes as long as you love it, Shabby Chic is more refined yet still just as eclectic. When you enter a space that is primarily in the Shabby Chic style, you’ll know right away. There are always tons of decorations out on display, usually vintage items and worn books, candles, fur throw blankets, and old wicker chairs. You’ll probably also find wooden items around the space as well, even if it’s old sticks in a very ornate vase in the corner. While it feels like anything goes with this style, it does take a person with very particular taste to be able to keep up with this specific style.”
Conclusion
In conclusion, both of these methods are very effective and something that just about anyone can do. You don’t have to be a master interior designer to be able to pull off these inexpensive and beautiful DIYs. They are the perfect element to add to your space to brighten up the room and make it overall seem more cozy and intersting. By adding a brick wall to your space, you’ll be bringing in a rustic texture into the mix, making the space seem equally modern and classic. You’ll be surprised at how much a simple wall texture can add to the overall look, feel, and atmosphere of a aspace.
Regardless of what method you decide on choosing, by incorporating a textured brick statement wall into your interior space you’ll notice right away just how much of a difference it can make. Explore your possibilities with color and brick size to make a more detailed approach to the overall aesthetic. Also, don’t be afraid to mix and match styles in a space, you’ll be surprised at how many different interior styles can match up perfectly with this special faux finish. All and all, this method is a great way to incorporate a fresh take on modern simplicity. A great way to explore more than just paint and wallpaper, so let’s get started! Be sure to also read our post on decorating your home.