
Vinyl is a great material to use for flooring. Despite its reputation as a cheaper alternative to hardwood floors, vinyl flooring has many qualities that make it stand out. For starters, it’s durable, easy to maintain, and beautiful to look at.
But even if vinyl plank flooring requires low maintenance, improper cleaning can make it appear old and make it lose its curb appeal
Which begs the question: How do you clean vinyl plank flooring the best way possible? To help you out, we prepared an infographic that will serve as a definitive guide on the subject. Scroll through the infographic (or print it out) so that you can start cleaning your vinyl plank flooring the right way.
This infographic can be used free of charge as long as you include a working link back to this page.
Click the infographic to see it in a higher resolution.
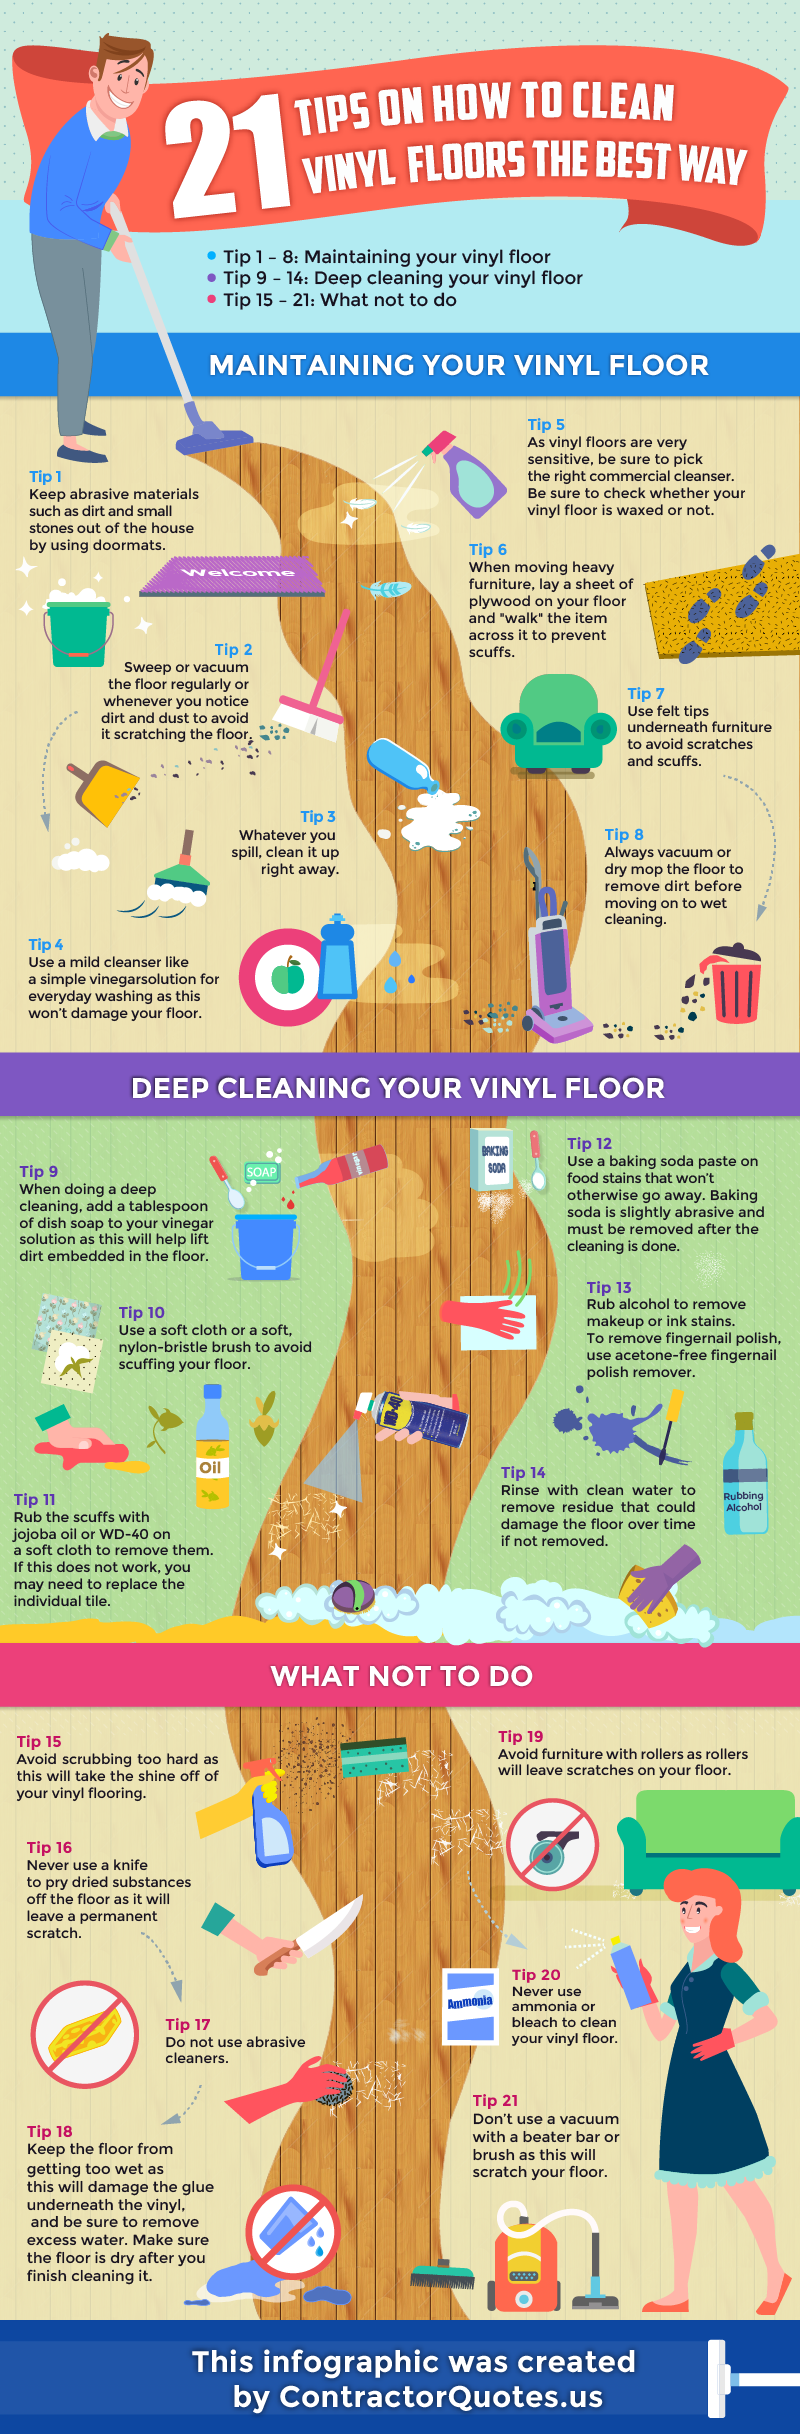
In our wish to provide you with the most actionable tips on the subject, we decided to go more in-depth by expanding on each of the tips mentioned in the infographic.
So, let’s get right to it! Below is a more in-depth guide on how to clean your vinyl plank flooring in the best way possible!
On this page:
- Keep abrasive materials out
- Sweep or vacuum the floor regularly
- Clean up spills
- Using a mild cleanser
- Pick the right commercial cleanser
- How to move heavy furniture
- Use felt tips
- Vacuuming
- Deep cleaning
- Using jojoba oil or WD-40
- Using baking soda
- Dealing with ink stains
- Rinsing with water
- Don’t scrub too hard
- Don’t use a knife
- Avoid abrasive cleaners
- Avoid excess moisture
- Don’t use furniture with rollers
- Never use ammonia or bleach
- Avoid vacuums with a beater bar
Tip 1: Keep abrasive materials such as dirt and small stones out of the house by using doormats.
Doormats are one of those home fixtures that are largely ignored but are actually necessary to a home. They are essential because they prevent dirt and water from getting into your interior floor every time someone– you or a visitor — steps inside your home. By keeping dirt away, not only do they make sure that your floor stays clean, but they also prevent it from getting scratch marks. Shoes frequently get in contact with harmful chemicals as well, so you’re doing your flooring a big favor by using a doormat that can take some of the abuse. This, of course, can go a long way into extending the lifespan of your vinyl flooring, or any type of flooring for that matter.
But what types of doormats should you use to keep dirt out of your house? To arrive at the right answer, ask the following questions first:
- How big should the doormat be? Obviously, your doormat should have the right size for it to do its job. Make it too small and a visitor might miss stepping on it and —you know the rest. The point is simple: Make your doormat wide and noticeable enough. If you don’t, your guests are likely to miss stepping on it, which won’t bode well for your floor.
- Will the doormat keep the dirt out? Some doormats actually make the problem worse by accumulating dirt over time and then using every visitor as a means to transport all that dirt into the home. So make sure that you buy a doormat that’s absorbent and easy to clean. Doormats made of weather-resistant materials such as teak or woven seagrass are ideal.
- Add an indoor doormat for good measure. What better way to keep dirt out than by having one doormat just outside the door entrance and another one placed neatly just inside the door? With two doormats, you can prevent dirt or grit from entering the house twice as effectively.
Tip #2: Sweep or vacuum the floor regularly or whenever you notice dirt and dust to avoid it scratching the floor.
If you’re going to vacuum your floor, you might as well do it the right way. So, here’s a trick: make sure that you dust the room first. This way you can “catch” the remaining dirt from the air with your cleaner as you proceed with the vacuum work. Also, make sure that you move furniture out of the way before starting.
You should also sweep or vacuum the floor on a regular basis, preferably daily. Otherwise, you run the risk of dirt and dust collecting on the floor and becoming a problem later on. And don’t forget to sweep the undersides of your chairs and furniture. In such cases, an extension duster, preferably one with a bendable, detachable head made of electrostatically charged fibers, should help you clean those hard-to-reach places without breaking a sweat.
Start or end each day with a good sweeping and your vinyl floor will look spanking brand new for a very long time.
Tip 3: Whatever you spill, clean it up right away.
Spills happen. You can even say that they are a fact of life. But if you’re not cleaning them up right away, then you’re not doing your vinyl plank floors any favors.
Remember, vinyl is vulnerable to water damage (just like hardwoodwood can get water damage too). If there’s one thing you don’t want to happen to your vinyl plank flooring, it’s water damage. Water damage is one of the common causes of structural damage to flooring. Sure, vinyl is made to last long even when exposed to water, but expose it too long and you’re going to have a problem sooner or later, and one of the most common causes of water damage is roof leaks that sometimes go undetected for a long time.
Tip 4: Use a mild cleanser like a simple vinegar solution for everyday washing as this won’t damage your floor.
A simple vinegar solution has always been the go-to-solution for cleaning vinyl floors. While safe, a vinegar solution has enough acidity to loosen up dirt or stains. To bring home the point, a 2010 study about proves that malt vinegar with 10% acidity is just as effective as most specialized cleaning products in eliminating inactivate influenza viruses. Vinegar is also biodegradable and non-toxic, making it an eco-friendly option for your home.
To create a simple vinegar solution, just mix water and vinegar (preferably apple cider vinegar) in equal measures and put the resultant solution in a spray bottle. After shaking the bottle for a second or two, spray away! You can spray the vinegar solution along the vinyl flooring and then wipe it up using a sponge or a towel.
You’re also free to use white vinegar if you want to disinfect the floor while cleaning it. If the floor is dirtier than usual, add a few drops of liquid dishwashing soap into the solution before mopping the floor. Mixing a few drops of baby oil with apple cider vinegar works as well.
Tip 5: As vinyl floors are very sensitive, be sure to pick out the right commercial cleanser. Be sure to check whether your vinyl floor is waxed or not.
While a simple vinegar solution is great for vinyl floors, using a commercial cleanser will prolong its shelf-life and give it a nice shine. That said, using the wrong cleanser might damage your vinyl flooring. Remember, vinyl is a sensitive material. If your cleaning solution is in concentrated form, you’d do well to mix it with water before spraying or mopping it across the floor.
If you’re going to use a commercial cleanser, check the label if it’s made specifically for cleaning vinyl flooring. It can get more specific than that. For example, a non-wax cleanser is specifically manufactured to clean floors that don’t have a waxed surface.
Tip 6: When moving heavy furniture, lay a sheet of plywood on your floor and “walk” the item across it to prevent scuffs.
Moving large appliances or furniture inside your home may produce scuffs, dents, or marks on your floor if you’re not careful. To prevent floor damages while moving furniture around, use plywood and carpet squares (plywood and carpet remnants pieced together). With the appliance settled on top of these squares, you drag the appliance or furniture by pulling on them.
Another option is to attach vinyl coasters to the furniture’s underside so that you can move the furniture with little effort and without causing any damage.
Tip 7: Use felt tips underneath furniture to avoid scratches and scuffs
Some chairs have a tendency to slide when you sit on them. This is even more the case when you have kids jumping onto your chairs all the time. Your vinyl flooring can only take so much abuse. Before you know it, you have scratches, scuffs, and scrapes on your floor. It’s not a good look.
Thankfully, placing felt tips or felt pads under each leg of your chair easily solves this problem. These items come with adhesives that easily stick to the underside of your chairs. They act like protective feet. Once they’re fitted, you don’t have to worry about the furniture causing dents or scratch marks on the vinyl floor. And yes, the kids can go back to playing now.
Tip 8: Always vacuum or dry mop the floor to remove dirt before moving on to wet cleaning.
Now we’re onto the great debate: to wet mop or to dry mop? Well, here’s an answer: How about doing both? And better yet, how about doing both in the proper order?
This is not a chicken or egg thing. The rule has always been to dry mop first, and then wet mop later. There’s a science to it.
So, why does dry mopping need to come first? That’s because dry mops are great at picking up dry dirt or debris such as dust, hair, crumbs, etc. Wet mops? Not so much. Do wet mopping first and you’ll end up pushing the debris around.
So, what you do is use a dry mop (preferably one with static) to remove dirt, dust, and other debris. Once they’re removed, pick up your wet mop and wipe up your floor using a figure-8 pattern.
And remember, use only non-abrasive mops. Mops with steel wool, after all, can leave scratch or scuff marks on your vinyl floor. When buying a mop, check first if it’s recommended for vinyl cleaning.
Tip 9: When doing a deep cleaning, add a tablespoon of dish soap to your vinegar solution as this will help lift dirt embedded in the floor.
When it comes to deep cleaning, you can always trust dish soap to do the work. Vinyl might be more sensitive than most flooring materials, but dish soap has been proven to be a gentle solution while maintaining its effectiveness as a deep cleaning solution. No surprise there. After all, dish soap is a pH-neutral cleaner, making it one of the safest soaps around. A tablespoon of dish soap to your solution is all you need to remove tough dirt or stains from the floor.
Tip 10: Use a soft cloth or a soft, nylon-bristle brush to avoid scuffing your floor.
Sometimes, in our efforts to make our floors look clean and pristine, we’re tempted to use hard brushes to get rid of tough dirt or chemicals. Bad idea. For one thing, putting too much pressure on vinyl floors always leads to scuff marks. So use a soft cloth or a soft brush instead. Your floor will thank you for it.
Tip 11: Rub the scuffs with jojoba oil or WD-40 on a soft cloth to remove them. If this does not work, you may need to replace the individual tile.
Scuff marks can be quite stubborn. If the usual vinegar solution isn’t doing the job, use a WD-40 lubricant or jojoba oil instead. Apply it on a towel and rub the scuffed area gently until the scuffs disappear. Once the scuff marks are gone, rinse away remnants of oil or lubricant with the usual vinegar solution.
Another way to use WD-40 is through a spray can. Just spray the scuff marks with the solution and leave it for a few minutes before rubbing it out with a rag.
Tip 12: Use a baking soda paste on food stains that won’t otherwise go away. Baking soda is slightly abrasive and must be removed after the cleaning is done.
Ah, the ever-reliable baking soda solution. When it comes to removing food stains, baking soda paste has many things going for it. Just apply the baking soda paste on a soft towel and rub it on the floor until the stain is removed. If the stain requires more scrubbing, just rinse the towel and re-apply baking soda as necessary. Once you’re done, use a vinegar solution to rinse the residue away.
Tip 13: Rub alcohol to remove makeup or ink stains. To remove fingernail polish, use acetone-free fingernail polish remover.
When your vinyl flooring comes in contact with tough stains like makeup or ink, you need a tougher cleaning solution than your regular vinegar and water mix. Baking soda might not do the job, either. For these jobs, an alcohol-based cleaning solution is more fitting. If your vinyl floor comes in contact with nail polish, you can remove the stains by using an acetone-free fingernail polish. Sure, acetone-based removers are more effective on account of their strength as a solvent, but they are likely to damage your vinyl floor.
Tip 14: Rinse with clean water to remove residue that could damage the floor over time if not removed.
Rinse your vinyl floor with clean water on a regular basis and you’ll extend its lifetime by a considerable amount. The residue, after all, can cause your floor to crack and splinter. Also, dirt can easily cling to soap scum, which could cause you problems down the line. Better yet, use two mops — one for cleaning, and another for rinsing.
Tip 15: Avoid scrubbing too hard as this will take the shine off of your vinyl flooring.
As is often mentioned in this guide, vinyl flooring isn’t made for hard scrubbing. Scrubbing too hard not only leave scuff marks on the vinyl floor, but it also takes the shine off of it. Again, only use soft materials when removing dirt and stains. There are many low-impact cleaning techniques you can adopt instead. For example, if there’s dirt that your mop or vacuum can’t remove, you can apply warm (not hot) water on the mop. Using mild soap can also help loosen tough dirt or stains.
Tip 16: Never use a knife to pry dried substances off the floor as it will leave a permanent scratch.
Keep those knives or any similar tool away from your vinyl flooring. Even if you’re careful, using them on your vinyl floor is likely to leave a permanent mark. Just apply a simple vinegar solution on a piece of soft cloth and scrub away at the dirt gently until the dried substances are gone. If that doesn’t work, use a dish soap instead.
Tip 17: Do not use abrasive cleaners.
Never, never use abrasive cleaners on your vinyl floors. Sure, it might get rid of dirt or stains more effectively than the regular vinegar solution, but it’s going to damage your floor in the long run, not to mention remove some of its shine.
In light of this, make sure that you check the composition of every commercial cleaner you grab from the department store. Most detergents are actually abrasive, and may even leave your floor looking dirtier because of the chemicals that are in them.
Tip 18: Keep the floor from getting too wet as this will damage the glue underneath the vinyl, and be sure to remove excess water. Make sure the floor is dry after you finish cleaning it.
As much as possible, limit the amount of water that you’re using to clean your vinyl floor as it might damage the glue that keeps your vinyl planks attached to the subfloor, causing the planks to come loose. Drenching the vinyl floor will cause water to seep between the planks, eventually getting trapped under them. Not good. Remember that part about vinyl floors being vulnerable to water damage? Exactly.
It is for this very reason why I’d not recommend using steam mops on vinyl flooring. After all, the dripping water effect tends to soak the floor. Moreover, the heat coming from steam mops can cause your vinyl floor to warp or bend, not to mention take away the shine from the finish.
It bears emphasis: use only as much water that is needed.
Tip 19: Avoid furniture with rollers as rollers will leave scratches on the floor.
Rollers make it easier to move furniture around the room, sure, but the wrong kind can still leave scuff marks on the vinyl floor. But for my money, I’d still rely on felt tips or felt pads as they make it a cinch to push your furniture around in the room without damaging your floor.
Tip 20: Never use ammonia or bleach to clean your vinyl floor.
Both ammonia and bleach are abrasive because they have a stronger base compared to most cleaning solutions. Don’t use either on your vinyl floor as it can damage the top layer and make it prone to cracks. This may sound like a broken record already but it deserves repeating: Use a simple vinegar solution instead! Vinegar should have enough acid in it to help loosen the dirt on the floor without causing any damage.
Tip 21: Don’t use a vacuum with a beater bar or brush as this will scratch your floor.
Using a vacuum with a beater bar on vinyl flooring is a bad idea. Beater bars help remove or loosen the dirt through a vibrating action. This, of course, can eventually damage your vinyl floor. Vacuums with a beater bar are more recommended for cleaning fluffy carpet instead. You should avoid using a vacuum with a brush on your vinyl floor for the exact same reason.
Final Word
So there you have it — 21 tips on how to clean your vinyl plank flooring the best possible way. Follow them to the letter and rest assured that your vinyl floors will look exquisite and appealing for many years to come.