
Have you ever tried growing your own plants, later on realizing that you made the mistake of underestimating it? How many times have you seen your once thriving plants start to turn yellow and droop, before eventually dying?
No, planting is never just about digging a hole on the ground, placing your seeds or cuttings, and giving them water and sunlight.
Would you believe this particular mindset is common and is actually the number one plant killer?
Caring for and growing your own plants is not as simple as that. You have to consider so many factors and all these would depend on the type of plant you have.
If you managed to kill off most of your plants and are still clueless what you did wrong, this article is perfect for you!
Best Way to Grow Plants: Tips You Need
Would you believe human DNA is closely related to plant DNA? That’s why there’s a not-so-secret secret to growing plants: treat them like how you would treat your child or your pet.
Plants also need to be cared for; you need to provide them with what they need. Your plants are also your babies and you should know how to raise them well.
But what if you don’t know how to care for your plants and keep them growing?
This is what this article is for. Here are some of the basic tips you need to know when it comes to growing your plants:
- Before anything else, you need to identify the type of plant you want to grow. This is important for you to know how to properly care for them. You don’t want to make the mistake of watering your cactuses as often as you do your apple trees, or placing your cactus away from the sun.
- The location is also important. Before you start planting, whether from seed or through cuttings, it is vital that you decide on the area where you want to place them. You need to make sure this location is ideal for the type of plants you want to place.
- Check the amount of sunlight on your chosen location and see if it gets direct sunlight for most of the day or not. Some types of plants love being under the sun for hours, but some are best kept under the shade.
- Choose if you want to keep your plants indoors or outdoors. Having plants in gardens may be ideal but there are also some species that can thrive both indoors and outdoors. While it is common to transport plants into pots, especially if you are growing them from seed, there are also plants that should never be transported at all.
- Adequate space for them to grow is also important. It’s undeniable that healthy plants will grow with the right amount of care. But the right question is, how high can they get? You need to consider this before planting.
- One of the many things that people don’t consider, especially those who are just starting out, is the kind of soil they need to use for their plants. At some point, you were one of those people, weren’t you? Plants will thrive best especially if they are growing on the right type of soil.
- You’re probably familiar with the saying that we all need at least 8 glasses of water each day. This is a universal rule. For plants, however, this is a different story. Not all plants need to be watered every day; some plants will require frequent watering and some will require you to basically leave them alone when watering is concerned.
- If you want potted plants, choose the right kind of pots to use. Most decorative indoor plants can be placed in any container, even teacups and hanging glass globes, but if you are using bigger pots, clay pots are always ideal. You can also use other types, such as plastic pots, but make sure that they have holes on them for drainage.
- Even if you have plants that love water, proper drainage is always important. Not having proper drainage for your plants will cause them to be waterlogged and this is one of the sure ways for your plants to die.
- Maybe you’ve managed to not kill your plants until now but did you know that you still need to check them out regularly? Even if they managed to grow several feet high, they are not invincible. You still need to do regular maintenance with them, like removing weeds and giving them the right fertilizer as they grow.
- Critters may make your garden look like that it came straight from a fairytale but you need to keep an eye out for these garden pests. But you should only call exterminators if they get out of control and start ruining your plants, because having these animals in your garden actually helps in balancing the ecosystem of your entire garden.
Now that you have a basic idea of what your plants need, you’re now ready to grow them.
How to Grow Plants

If your plants came from the nurseries or were bought from the store, it’s probably safe to say that your plants are already potted. What you had to do is just transfer them to a pot or to your garden. But what should you do if you want to take on the challenge of starting from zero?
What you should know is that there are two basic methods of growing plants: from seed or from cuttings.
You might be hesitant to grow plants from seed, thinking it is much more difficult to do so than grow a cutting from an already healthy plant. But did you know that it’s actually easier and there is a greater chance for your plant to grow from seed than from cuttings?
If you decide to grow a plant from seed, here are the general steps for you to follow:
- Learn what season or month is the right time to plant your seeds. If you got your seeds from a store, this information is usually found on the seed packet.
- Unless the plant is known not to survive being transported, you need to prepare small pots or containers where you will place your seeds. Ensure that they have holes to allow excess water to drain.
- Place some potting mix in your chosen container. Make sure not to fill it up; the potting mix level must be lower than the edge of your container.
- Water the soil to moisten it. You need to compress it after to remove gaps in the soil.
- Check whether the seed should just be sprinkled on top of the soil or must be buried under it. For the latter, make a hole in the soil for each seed you want to plant. These holes should be shallow, with a depth of ideally about four times the size of the seed.
- Place a seed in each hole, covering it up with soil afterwards and then sprinkling some water on it.
- Covering the containers with plastic wrap can help them germinate faster. Remember to puncture some small holes on the wrap for water to pass through when you water them.
- Light is important for seeds, even if the plant is the type to grow only in shade. During this time, you need to place them in an area where there is adequate sunlight.
- Water them regularly, but do not let the soil become soggy due to overwatering. It’s important to just keep them moist, not soaking wet.
- When they start growing into seedlings, that’s the time you can add fertilizer. But at this stage, we suggest just using liquid fertilizers first.
- As they grow, slowly move them towards the location where you will eventually transfer them. It’s not a good idea to move them from where they were initially planted to where you want to plant them permanently in one go. Like us humans, plants also need to take time to adjust to their environment.
If you already have a beautifully growing plant and want to have more of it, or someone you know has an amazing plant that you think would look great in your garden, growing another one from cuttings is your best bet.
Here are the basic steps you need to follow if you want to grow plants from cuttings:
- Prepare the potting or propagating mix where you will plant your cutting but make sure not to mix in soil yet.
- Make sure that the plant where you will get your cutting from is healthy. You should never use cuttings that came from a diseased plant because this can affect other plants once you place those cuttings in the same plot of land.
- Choose where you should get your cuttings from. It’s common to use stems for this method of planting but some plants can also thrive if they grow from root cuttings, the tips of the plants, or even leaves.
- Prepare the tools you need to make the cut. Pruning shears are ideal, especially if you are cutting stems. Clean them first before using.
- When cutting stems, make sure you cut diagonally, resulting in a 45˚ angle at the cut section. Your stem cutting should be between 3 to 6 inches long.
- Remove the leaves on the cutting’s lower half, because this is the section that will be planted.
- As soon as you finish removing the leaves, place the cutting immediately on your potting mix. Make sure that there are nodes, or parts of the stem where the leaves grow out, that are buried in your potting mix. You can also dip the end of your cutting in rooting hormone to make them grow faster before putting it on the potting mix.
- Place your pot with the cutting in a shaded location. Cuttings won’t thrive and form roots under direct sunlight.
If you don’t want the hassle of growing plants from seeds or cuttings, it’s best for you to just get plants that are already growing and are already potted. All you need is to transfer them to your garden once you get home.
Think again if you believe that it’s as simple as taking this literally and just removing the plant from the original container and transferring it. Even with this method, you need to know how to plant them correctly to give them a better chance of survival.
If you want to transfer a store-bought plant that grew in a container to your garden, you need to do the following:
- Remove them from the container and check the condition of their roots. If you see roots that are quite thick and already girdling, you need to cut them away. These roots can block the flow of nutrients and minerals to the other smaller roots, which can slowly kill your plant.
- If your plant is already rootbound, that is, the roots have nearly covered the entire soil of your plant and have taken the shape of the container, you need to cut away the outer sections of the root-ball that was formed in at least three locations and from top to bottom. Roots will regrow so don’t worry about harming your healthy plant.
- Dig up a hole on the area where you want to transfer your plant. It should be deep enough that the highest part of the root-ball of your plant is a little over ground level. Make sure it is also wide enough to allow roots to expand as your plant grows. At least twice or thrice the width of the root-ball is the ideal width of the hole.
- Place your plant in the middle of the hole and fill it halfway with soil before removing any rope, twine, or wire holding the root-ball.
- Cover the rest of the hole with soil and then make a soil berm around the hole, not the root-ball. This would act as a water barrier when you irrigate so make it a couple of inches high.
- Pour around 3 to 5 gallons of water inside the soil berm and allow it to settle and be absorbed by the ground on its own.
It is not enough for you to know how to properly plant them. You also need to know how to care for plants to make them grow healthy over time. This is why it is important for you to know your plants and their needs.
Nourish them with the right soil and fertilizer. You also need to provide them with the right amount of water and sunlight all the time. Just like how we need food, water, and light to thrive, plants also need the same thing.
Plants are mostly low maintenance but that does not mean that they will survive on neglect. It is still important for you to check on their condition every once in a while. They can easily get diseases or experience animal infestation if you’re not looking.
What Helps Plants Grow
Now that you have an idea of how to plant them, you need to know how to make them thrive.
Fertilizer, water, sunlight, and soil. These are all the basic necessities and are important for any plant to grow healthy.
A general rule is that you should avoid fertilizing your plant within the first two years, regardless of the method of growing them. If you need to, only add them in minimal amounts and as needed. Mixing in fertilizer with the soil they are growing on should only be done generally after your plant has established itself. You should know what kind of fertilizer works best with your plants but as much as possible, go for natural fertilizers.
You probably noticed how much emphasis we put on watering your plants. This is because watering will make or break your plant – they can thrive because of it or be killed by it. If you want your plants to grow healthy, make sure that you give them just the right amount of water. Identify if they are the type that should be watered several times a day, once a day, or just a few times in one week.
The same is also true when it comes to sunlight. Some plants need as much sun as they can get and some have to avoid it to grow. They are just like us, haven’t you noticed? Some love being under the sun and will thrive well whenever they spend hours basking in sunlight but there are also those who need to shy away from the sun and stay in the shade to avoid getting sick.
The right type of soil is vital for any plant. Just like how plants have different varieties, soil also has different types and you need to learn which works for your plants. The soil, especially when combined with the right kind and amount of fertilizer, acts as the primary source of nutrients of a plant. Think of them as the source of their food; you should give them the right kind of soil just like you would give the right kind of food to anyone with allergies.
There are other factors that contribute to the healthy growth of plants but these four are the basics you need to focus on. As long as you constantly keep them in mind, there’s a better chance for your plant to grow and thrive for years to come.
Loam Soil
After we mentioned the importance of selecting the right type of soil, you might wonder what the right kind of soil for you to use is.
If you are just starting out when it comes to gardening, loam soil is the best type for you. This is perfect for beginners because it combines the best characteristics of clay, sand, and silt soils.
Clay soil is known for their water retention properties, sandy soil has a great draining capability and allows air to circulate, and silt can be compacted and also binds sand and clay soil well. Combine all these and you get loam soil.
Do you now see why loam soil is perfect for you to use on your garden?
Even with its versatility, there are still species of plants that may not thrive well when planted in loam soil. So, check first if your plants can grow in it or they need only one specific type of soil.
Rototilling
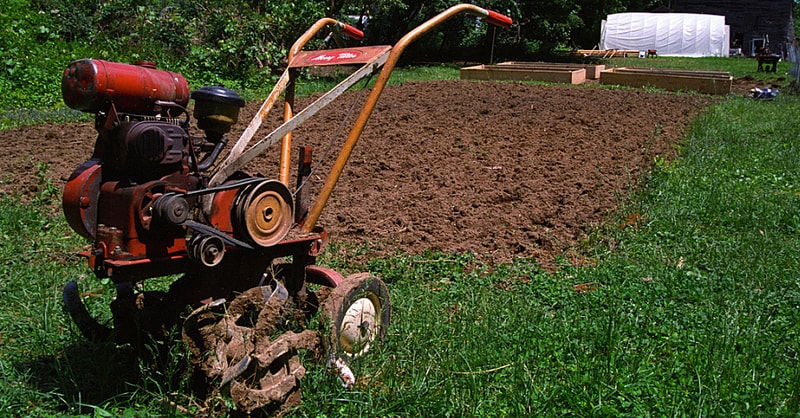
Have you heard about rototilling? This method is used by a lot of gardeners and farmers to prepare plots of land for planting. Manual tilling is still being practiced, but many people now turn to rototilling for the convenience. After all, it’s much faster to use a machine than turn over soil and level them by hand.
Rototilling is great, especially if your soil is too compact and hard for you to manually till. It is nearly impossible for anyone to work with hard soil and this is where rototillers come into action. They can penetrate these soils and break the hard clumps up to loosen them enough for you to work on.
Another benefit of rototilling is that it works great at distributing the fertilizer over a plot of land. Not only that but rototilling can also improve the soil structure, especially when you add layers of compost on top of your soil and begin rototilling over it. But you also need to be wary of doing this too much because it can end up ruining the structure of the soil instead.
If you plan to rototill, make sure that the soil is neither dry nor wet; it should just be moist enough to be worked on. If you plan to rototill to spread out your compost or fertilizer, make sure to prepare the plot by doing a pass using the rototiller or rake on the soil before adding the compost or fertilizer. Add the fertilizer or compost and then use the rototiller again to mix them up, then check for other areas of the plot that need another pass by using a rake.
Before planting on the freshly rototilled land, allow it to rest and leave it undisturbed for at least a week. This allows you to see if weeds and other plants will grow and when this happens, you need to do another round of rototilling. If not, you can now plant your seeds on the rototilled plot of land.
A professional landscaping company can easily do the rototilling for you if you like the convenience of not having to do it yourself.
Easy to Grow Plants
By now, you might have realized that growing plants is really not as easy as it seems. This might even deter you from starting the garden of your dreams.
Don’t fret. There are actually so many species of plants that are easy to grow and perfect for beginners who have yet to confirm if they do have green thumbs.
Think of them as your guinea pigs; try growing these varieties first before moving to the more complicated ones that need special care.
If you want to experiment and try growing plants from seeds, you can start with certain herbs, flowers, and vegetables because they are generally the easiest to grow. Basil, in particular, is such an easy herb to grow. If you want to try your hand at growing vegetables, why not start with beans, cucumbers, or even pumpkins? But if you prefer flowers, go with zinnias, sunflowers, and cosmos.
If you do go for vegetables, make sure to read our guide on vegetable gardening.
If you prefer to start growing plants using cuttings, start with deciding on which part of the plant you want to use. For stem cuttings, begonias and ivy are easy to grow and quick to multiply. Begonias are also suited root cuttings, as well as African violets and coleus. You can also use the tips of African violets for this method, together with geraniums and citrus plants. But if you want to use the leaves and grow them, cactus and succulents are your best bet, especially the jade plant.
If you need help getting started with your plant growing needs, we can also help connect you with landscaping companies in your area to help prepare the soil for you or answer any questions you may have.