Roof stains are ugly. If you place value on maintaining your home’s curb appeal, you’d do well to ensure that you are rid of them. Even more so if you’re planning to sell your home in the near future. If you want to keep up your home’s resale value, you have to get rid of those ugly stains in whatever means necessary.
Granted, removing roof stains is not easy. So we came up with this comprehensive guide to give you all the information you need to know on how to get rid of those ugly roof stains.
Are roof stains a problem?
Everyone can agree on one thing: roof stains take away from your home’s aesthetic value. But will roof stains cause you problems purely on a purely functional and practical basis?
Well, not AT FIRST.
The thing with those unsightly black streaks is that they make the roof a breeding ground for lichen or moss. If allowed to thrive, these critters can cause the asphalt shingles on your roof to rot or decay faster. As the algae feed on the limestone, they wear away at the light-reflecting granules on the asphalt. Once those granules have been whittled away, you might as well bid your roof adieu.
In other words, allowing roof stains to thrive on your roof is one good way to shorten its lifespan.
What causes black streaks on roof shingles?
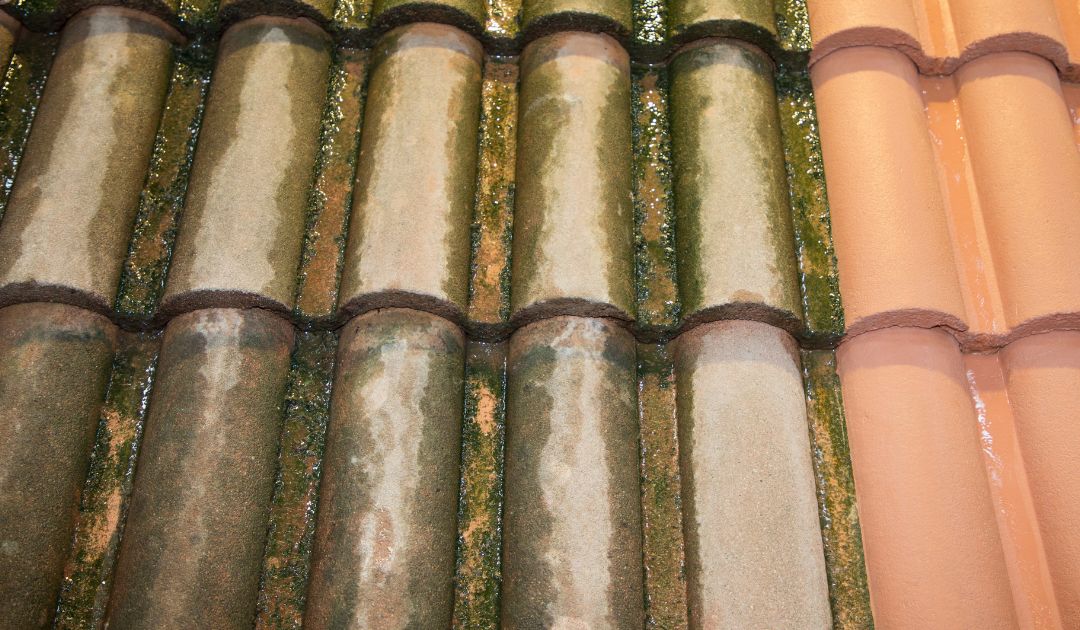
Those ugly black streaks are caused by the buildup of blue-green algae called Gloeicapsa Magma. This type of bacteria finds sustenance by feeding on moisture and the limestone filler commonly found in asphalt shingles. These algae appear blue-green at first, particularly because of the outer coating they produce to protect themselves from the sun’s ultraviolet rays. The algae, if left to rot, eventually turn black, causing dark streaks to appear over your roof.
Algae are transported to rooftops through the air in the form of spores, spreading more rapidly when exposed to wet and humid environments. These unsightly streaks are more commonly found in areas where rain and humidity are commonplace.
These black streaks also appear mostly on the northern slopes of roofs. This is because these areas are the least exposed to moisture and sunlight, making them an ideal environment for algae to thrive and grow. Goes to show why areas in the Southeast, where the weather is mostly warm and humid, are more prone to roof stains than in other areas in the United States.
If left to fester, the algae and fungus eventually develop into lichen, sticking to and feeding on the granular coating of the roof’s shingles. Lichen is far more difficult to remove than the common roof stain. And you’re far more likely to damage your roof further if you try to power wash or scrub them away. Prevention, as they say, is the best cure.
Roof stain removal products
There’s no shortage of roof stain removal products out there. However, you need to be careful in deciding which one to use. Cleaning solutions containing corrosive chemicals can damage asphalt shingles, shortening the shelf-life of your roof. However, cleaning solutions with the right amount of these chemicals might prove effective at removing roof stains without causing damage to your asphalt shingles.
TSP Bleach Water Mixture
The TSP (tri-sodium phosphate) Bleach Water mixture is the most recommended cleaning solution for removing black algae from asphalt shingles, and for many good reasons. It’s not only effective at removing black stains, but it’s also safe for the environment.
The basic formula for creating the TSP Bleach Water mixture is as follows:
- 1 quart bleach (6% sodium hypochlorite)
- 1 gallon water
- ¼ cup TSP
Oxygen Bleach
Oxygen bleach solution is powder mixed with water. While it doesn’t get rid of roof stains as quickly as the TSP Bleach Water solution, it does get the job done in the right conditions. The trick is to use it during cool weather, allowing the solution to soak the asphalt shingles for at least 45 minutes without evaporating.
Oxygen bleach might not produce quick results, but it’s the least corrosive cleaning solution that gets the job done. It’s also the least harmful to the environment.
Chlorine Bleach
Chlorine bleach (sodium hypochlorite) is a popular roof cleaning solution because of its low cost and accessibility. Many roofing contractors, however, discourage the use of this cleaning solution because of its caustic and corrosive components. It’s so corrosive, in fact, that it can compromise the color of your roof. Moreover, it only gets rid of mold at a surface level. It doesn’t kill the black mold structures. Using it may make it appear as if the algae have been removed, but the stains are likely to return in 9 months. Oftentimes, the mold becomes worse by then.
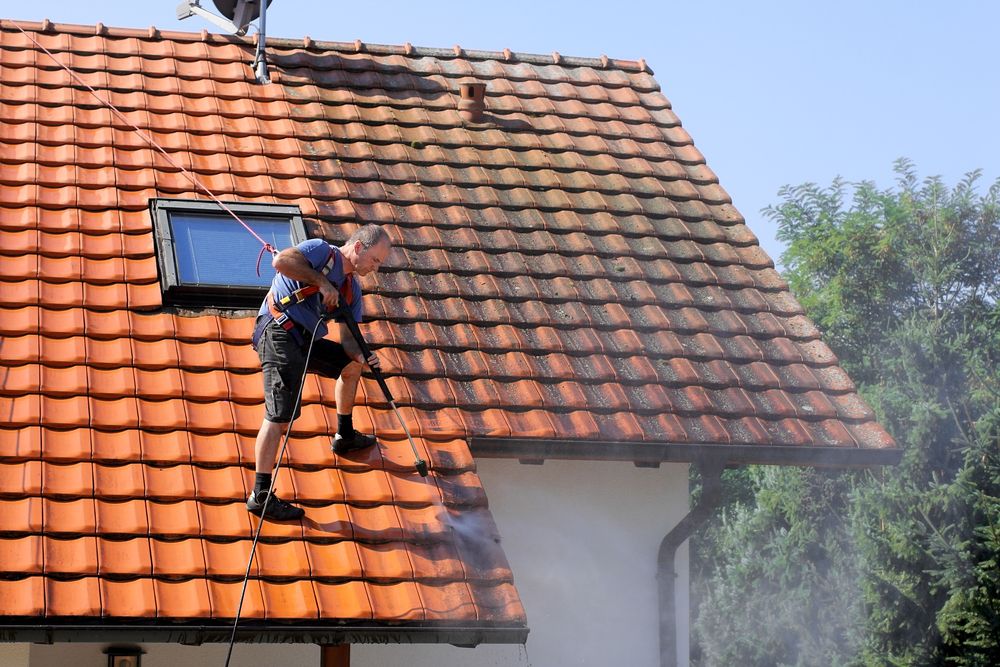
How to remove roof stains
You must schedule the roof cleaning on a clear and cool day to ensure that the cleaning solution won’t evaporate quickly. Pour the cleaning solution into a pump type garden sprayer. Mix it well.
Once you’re established in your position on the rooftop, just spray away at the roof stains until the entire surface is coated with it. Work your way from top to bottom and avoid standing on the wet areas. Let the solution soak for 15 minutes before rinsing it away with a garden hose. Don’t allow the solution to stay on the shingles for more than 20 minutes or it may damage the granules coating the roof.
Note: Pressure washing should be avoided at all cost. Applying too much pressure can cause the protective granules from the asphalt shingles to get dislodged. Your shingles become more vulnerable to external elements without those granules to provide them protection.
Cleaning a roof with bleach
Bleach might be corrosive, but it can prove effective at cleaning your roof if the right amount is used.
Here’s the recipe for creating the perfect bleach solution:
- 1 gallon of hot water
- 1 full cup of chlorine bleach
- 1 cup of powdered laundry soap
Pour all ingredients into a large bucket and mix them thoroughly with a long stirrer. Transfer the contents into a garden sprayer, mix well, and spray away until there’s a generous amount of coating on the shingles. Let the solution stay on the shingles for 15 minutes before rinsing it with a water hose. Repeat the entire process until the entire surface has been cleared away of stains.
Mistakes to avoid when cleaning a roof
Cleaning a roofing system is obviously not for the faint-hearted. The roof is not a good place for anybody to commit mistakes. Moreover, you run the risk of making things worse for your roof if you’re not familiar with the best practices involved in roof cleaning. Knowing which mistakes to avoid also lets you get the job done with minimal effort, cost, and time.
Now’s a good time as any to brush up on the most common mistakes people commit when fixing a roof. You’d be doing yourself and your roof a favor by avoiding them.
Pressure washing your roof
You should not, under any circumstance, pressure wash your roof. For one thing, the effects of pressure-washing are only temporary. It only removes the top layer of the algae, not the spores themselves. Pressure-washing does remove the black streaks on your roof, but they usually return in less than a year.
More importantly, pressure-washing can potentially damage your roof since applying too much pressure on it knocks the granules lose. The granular loss makes your roof vulnerable to external elements, shortening its shelf-life by a significant amount.
Besides, pressure washing your roof compromises your roof warranty. Considering how damaging pressure washing can be to roofing systems, it’s no wonder roofing manufacturers are trigger-happy at voiding warranties when they spot the merest sign of it.
Using toxic cleaning solutions
The harmful effects of toxic cleaning solutions have been discussed briefly in a previous section, but they deserve another mention here. Some homeowners and even roof cleaners are tempted to use strong chemicals because they produce an instant effect.
However, such cleaning solutions eventually compromise the integrity of your roof, not to mention cause harm to the environment and your health as well. Besides, using them is not worth your while because their effects are only temporary.
Being too aggressive with the cleaning
When it comes to roof cleaning, there’s such a thing as overdoing it. Using an aggressive approach may produce the desired results in the short-term, but it ultimately shortens the lifespan of your roof. Overcleaning only serves to put the spores at bay only for them to come back three times heavier the following year.
Overall, the best approach to cleaning your roof is to use environmentally-friendly products that not only get rid of those black streaks, but also promote the longevity of your roof.
Installing copper roof strips to keep algae stains away
Cleaning your roof regularly just to keep those algae stains away can be exhausting and frustrating. Thankfully, there’s a more effective method: installing copper roof strips on your roof.
If that gives you pause, consider this: have you ever noticed that black streaks aren’t present on areas of the roof directly underneath galvanized metal, and even less so when whole copper roofs have been installed?
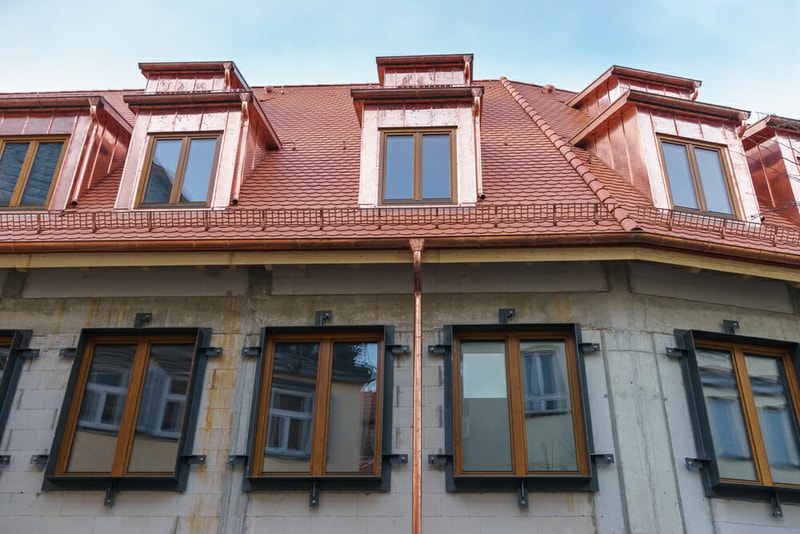
This is because algae find trace metals toxic. Algae can’t stand the stuff.
So, how’s this for a solution: Let’s give them more metal than they can deal with.
To pull this off, you only need to install copper (zinc or lead are good alternatives, too) strips under your roof shingles!
So, how exactly do copper or zinc strips keep those algae away? Once installed, these strips regularly come in contact with water every time it rains. This causes the copper ions (or zinc chemicals for zinc strips) to wash off from the strips and to flow downhill, eventually coating the shingles directly below them. Since algae are incapable of digesting moisture that contains copper ions or zinc, their growth is stunted as a result.
That’s great! But how do I install these strips on my shingles? you ask.
Let’s take it step by step, shall we?
Buying the copper or zinc strips
The first order of business is to look for copper or zinc sheets from a roofing supply store within or near your area. If there are no roofing retailers nearby, you can buy them from the nearest Walmart or Lowe’s.
Make sure that you buy only the lightweight versions since they are far easier to install. Besides, heavy-duty copper sheets won’t make a speck of a difference in terms of their potency.
Figuring out how many strips you need to purchase is where it gets tricky. But as a general rule of thumb, the strips become more effective at stunting the growth of algae if they are able to reach the peak of your roof. One copper strip across the full length of an entire roof should protect up to 18 feet of roof directly below it.
Installing the copper/zinc strips
Position your ladder so that it leans securely against one end of the roof. Once you’re in a perfect position, slide one of the strips underneath the asphalt shingles laid along the roof’s ridge. Take care not to hit anything for about six inches. Secure the strip to the shingles by hammering it with nails. Place the nails into a rubber gasket to prevent moisture from leaking into these areas. Continue this same procedure along the entire length of the roof until you have an entire strip installed along the entire length of the ridge.
Once you’re done, the strips should be in a position that allows the copper or zinc chemicals to come off and trickle down the roof every time it rains. This, of course, makes the roof resistant to algae.
Replace the copper or zinc strips once they’re “expired”
Here’s the downside to copper or zinc strips: the chemicals that they contain have an expiration date, meaning they wear away over time. Once they’ve overstayed their welcome, your roof may become a breeding ground for algae again, and by then you’ll have to install new strips again. Make sure you check the strips at least once a year to determine if they need to be replaced. Most copper or zinc strips can last for five years or so.
Safety precautions when working on a roof
1. Wear a safety gear
Make sure to put on non-slip work boots (choose footwear with good traction!), work gloves, and protective eyewear before going up on the roof. More importantly, wear a safety harness. You don’t want to tempt fate by putting yourself in a position where you could fall to your death. By wearing a safety harness, the worse you’ll get are bumps and bruises when you do slip.
2. Make sure the ladder is secure
Is the ladder sturdy enough? If you’re going to use one, make sure that it won’t break easily. Here’s a checklist you can use to inspect if the ladder is strong enough:
- Are the feet worn or damaged? Are they all intact?
- Are the rungs bent out of shape or missing?
- Are the treads slippery?
- Are the fixings or screws holding the ladder together secure and tight enough?
- Are the stiles in good condition?
You also need to ensure that the ladder is supported by an even ground. If not, putting a piece of plywood below it should help to keep it steady in its position. Another effective method to ensure that the ladder stays immobile is by tying one leg of the ladder to the lip of the gutter with a strong cord.
3. Work only during favorable weather conditions
Severe weather not only increases the likelihood of slips and falls, but it can also hinder your work. Strong winds and heavy rain are a deadly combination, and you’re better off siding with caution and waiting for ideal weather conditions before cleaning your roof.
4. Clean the roof
You need to set up the roof in such a way that makes it ideal for making installations. The roof is a high-risk environment, and you need to get rid of obstructions that may block your view or increase the likelihood of accidents. Even one random branch can cause you to lose your footing.
5. Install toeholds
Toeholds can help you maintain your balance and footing even on a steeply-pitched roof. To create toeholds on the roof, simply nail 2 x 4 wood cleats to the roof deck. You can always remove them once you’re done working on the roof.
6. Move carefully and stay alert
Make sure that every movement you make on the roof is carefully considered. You must focus on what you’re doing and stay aware of your surroundings, especially the edge of the roof.
Roof cleaning costs when using a pro
Most roofing systems these days are built to last, thanks in large part to modern roofing technology, but that doesn’t mean they won’t require regular maintenance. If you want to prolong your roof’s lifespan, you need to have it cleaned on a regular basis. More importantly, you need to do everything necessary to keep those roof stains away.
That said, roof cleaning will cost you money. And it goes without saying that you need to set aside a budget for it. Besides, regular cleaning can help you maintain your roof’s curb appeal, which consequently keeps your home’s value up.
The national average cost for professional cleaning ranges from $350 to $500, with the average amount being around $450. To be on the safe side, set aside a set budget amounting to at least $600.
There are numerous factors that determine the overall cost of professional roof cleaning, and we’ll discuss them one by one so it’d be easier for you to make a rough estimate depending on your own circumstances.
Size
The bigger your roof, the longer it will take for professional roofers to clean it. Most contractors charge by the square foot, but some will charge you by the square — which is equivalent to 100 square feet.
Pitch or slope
Higher-pitched roofs pose more risks for workers, requiring them to use safety equipment to get the job done without injuries. Also, the steeper the roof, the more difficult it will be for workers to carry their materials and equipment to the top. Professional contractors may even use improvised equipment such as a winch platform or a conveyor system, and they will charge accordingly.
Location
The location of your property plays a huge factor in determining the overall costs of hiring professional roof cleaning services. If you live in a location that is prone to humid or rainy weather, then chances are roof cleaners are going to charge you a higher price. This is reasonable considering they will need more time cleaning your roof on account of all the stains, mold, mildew, and grime that need to be removed.
Getting free quotes from competing contractors
Now that you’ve reached the end of the article, you’re probably, at the very least, entertaining the notion of hiring a roofing contractor who will get rid of those roof stains for you. But the paying part is probably giving you pause. Hiring a professional contractor, after all, can be expensive, and you’re right to be concerned about the notion of parting with your hard-earned money. The thought of going full DIY has probably crossed your mind as well.
The decision to hire a contractor or go DIY is yours and yours alone. But allow us to at least give you one piece of advice: Get free quotes from competing contractors first.
We offer this advice because every homeowner deserves the opportunity to make an informed decision on matters concerning their home. By getting as many quotes as you can, you’re putting yourself in a better position to do that.
But here’s another problem, getting multiple quotes can be time-consuming, not to mention costly. As if seeing black streaks on your roof isn’t frustrating enough.
We feel your pain. So, we’re making things easier for you by offering you FREE quotes from competing contractors.
So, how do you get the free quotes?
Easy. Simply fill out the form that you see on this site, and we’ll send you a list of the most competitive roofing contractors in your area along with the corresponding quotes.
No B.S. No obligations. Get your FREE quotes NOW!