
When it comes to roof leaks, you can’t leave anything to chance. Allow a roof leak to progress and it will eventually lead to even more serious problems. And when problems become serious, it won’t exactly bode well for your bank account.
The notion of a leaking roof is something every sensible homeowner dreads. But here’s a lifehack that would make your life a bit easier: Learn how to tarp a roof without nails.
Because guess what? A tarp can save you from a leaky roof situation in more ways than one, and the process becomes much easier if you can do away with nails. While tarping a roof with nails has its advantages, the process can be a little unwieldy for those who are inexperienced with roofing jobs.
Sounds impossible? Not for us! And we’ll even demonstrate to you the steps on how to do it.
Dangers of a roof leak
But before we get to the meat of the matter, let’s discuss the potential issues you may face if you allow a roof leak to have its way on your home.
Structural Damage
A leaky roof doesn’t only negatively impact the roof and the cellar, it can also affect the structural integrity of your home. Water that leaks through the roof can go into the walls and the home’s wood framing. Allow all that moisture to penetrate your home’s nooks and crannies and it will cause the wood to rot and get weaker, resulting in structural damage.
Once the structure of your home is compromised, it won’t be long before it starts sagging or collapsing under its own weight. It won’t happen immediately. It might take years, even. However, that doesn’t mean roof leaks don’t deserve quick resolution. Structural damage, after all, requires major work, not to mention hefty repair costs.
Mold and Mildew
Roof leaks can make your home a breeding ground for mold and mildew. Mold and mildew love water. They take root on damp surfaces, including basement walls, fabrics, or bathroom surfaces. Allow moisture to invade your home and these little creatures will thrive.
Obviously, you need to prevent them from taking root and spreading. Mold and mildew, after all, can negatively impact your health. They’ve been known to cause numerous respiratory issues. To get rid of mold in your home, you can hire the services of a mold remediation professional.
Fire and Electrical Hazards
Roof leaks increase the likelihood of accidents in your home in a variety of ways. If the water penetrates your roof, it may come in contact with electrical wiring with damaged insulation. This poses a fire hazard that could lead to more damage in your home, not to mention injuries or even death.
Leaks can also get into metal junction boxes, which could lead to electrical shocks. As soon as you see the first signs of a leak, it’s imperative that you shut the electrical switches connected to the affected area before calling an electrical contractor to have them inspected.
Slip Hazards
A leaky roof can cause water to puddle on the floor, which can lead to slipping accidents. If you’re running a commercial establishment and a customer slips on a puddle of water, you run the risk of getting sued for physical damages.
Staying safe when repairing your roof
Roof leak repair jobs are undeniably dangerous. As such, you need to take certain precautions before you make any plans to go up there. Here are the steps you can take to ensure safety while making repairs on your roof.
1. Use a strong ladder to go up that roof.
Make sure that the ladder is standing on an even ground. If not, lay down pieces of plywood on the ground so that the ladder can stay level even on sloping ground. If the ground is made of slippery dirt or grass, dig a hole where each foot of the ladder can fit in to avoid them from slipping.
2. Wear shoes or boots suitable for roofing jobs
You don’t want to lose your footing while you’re up there. As such, you need to wear non-slip shoes or boots that have good treading and traction. Ideally, you must wear shoes or boots with outsoles that are made of rubber since they have the best grip even on wet surfaces.
3. Avoid stepping on the roof tarp.
Most tarps are slippery even when dry. Keep stepping on them and you run the risk of having your feet slide from under you. Tread carefully around those tarps and give them a wide berth.
4. Don’t install the roof tarp without help from a friend.
Things could get dangerous up on the roof, and bringing at least one companion with you up there should give you the assurance that someone is there to save your hide or call for help if you happen to find yourself in a life-threatening situation.
5. Don’t tarp the roof during threatening weather.
Fixing your roof in pleasant weather is already dangerous, what more if you do it during a heavy downpour and while strong gusts of wind are threatening to blow you off your feet? Don’t risk it.
6. Use a safety harness.
Don’t want to fall off the roof? How’s this for a solution: Use a safety harness! You can choose from a wide variety of safety harness kits from the nearest Walmart or Home Depot in your area.
7. If in doubt, call for professional help.
As a DIYer, there will be roofing tasks that are beyond your skill level. Considering how dangerous and complex roofing jobs are, you’d be doing yourself and your roof a favor by leaving it to the professional.
8. Take regular breaks.
Overexerting yourself up there might make you lose your concentration or cause you to lose your grip or footing. Breaks are always necessary when you’re working in a treacherous environment. Don’t hesitate to take them when you’re feeling winded or fatigued.
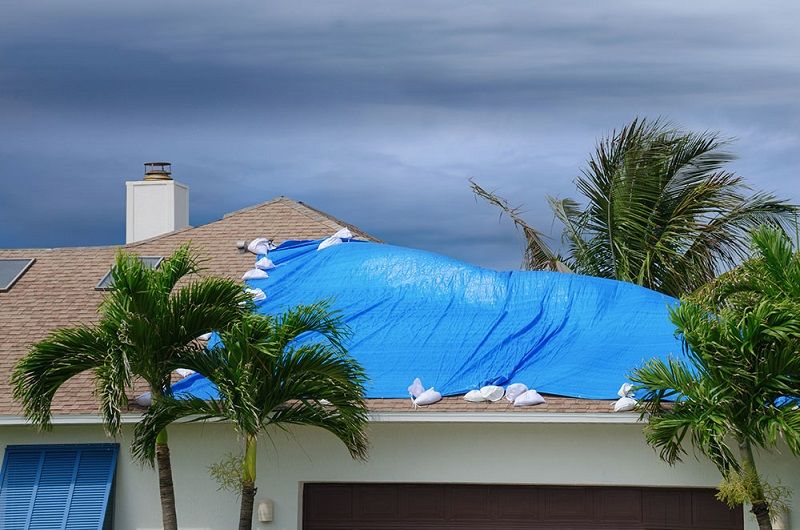
Installing Tarp on a Roof Without Nails
Installing a tarp on your roof is easier than you think. It’s even easier if you do it without nails. Here are the steps on how to install a tarp on your roof without nails.
1. Find the source of the leak.
You need to know first which spot on the roof needs tarping up. Climb on top of the roof to check for any loose shingles or damaged vents. Are there signs of water damage on the roof? If you’re unable to detect signs of a roof leak from above, you can go to the cellar and check for signs of water damage there. Once you see it, you can trace the damage to its source.
2. Measure the dimensions of the tarp to be used.
It probably goes without saying, but the size of the damage also determines the size of the tarp you’re going to use.
One important thing to keep in mind is that the tarp should be big enough to overlap the roof’s peak. Otherwise, the water will sneak into the underside of the tarp, allowing the water to continue infiltrating your home.
As a general rule of thumb, the tarp must overlap the roof’s peak by at least four feet.
To measure for the tarp, make sure that you bring a measuring tape with you when you go to the rooftop.
3. Buy a self-adhesive roof tarp.
You don’t have a tarp lying around inside your home? It’s time to change that. The question is, what type should you get?
While there are many types of tarps to choose from, you can’t go wrong with buying a self-adhesive tarp. Since we’re aiming to cover up the roof without the need for nails, you need a tarp that sticks to the roof without additional fasteners. You can buy self-adhesive tarps at the nearest Walmart or Lowe’s in your area.
Note: Before buying a self-adhesive tarp, make sure that it’s been specifically made for the type of roof material you’re using. If you’re using asphalt shingles, for example, buy a self-adhesive tarp that’s been manufactured to adhere to that type of roofing material.
4. Install the tarp.
Before setting up the tarp, clear away any dirt or debris on the roof, making sure there are no horizontal obstructions that could cause water to pool. Remember: water is meant to flow downwards as soon as it hits the roof. Allow water to pool and the built-up pressure will eventually cause more leaks.
If you plan to place sandbags on the roof, make sure that each narrow end is pointing up or down along the slope. More importantly, the tarp should be long enough to hang over the roof’s peak, allowing the water to flow downhill without seeping into the tarp’s undersides.
Most self-adhering tarps don’t stick well to wet surfaces so make sure that the roof’s surface is dry. If there’s moisture on the affected area, you can apply a heat gun or a torch on the surface for a few minutes to make it more adhesive-friendly.
How much do roof repairs cost?
So, you’ve managed to tarp your roof without nails? Great job! Bear in mind, however, that tarping is just a temporary fix. No matter how strong the tarp is and how well you’ve installed it on your roof, wear and tear is going to take its toll on the material sooner or later.
Moreover, your tarp isn’t immune to the effects of a severe storm. Besides, the main purpose of tarping is to buy you enough time to make more permanent roof repairs.
Which begs the question: How much do roof repairs cost anyway?
That is a complex question that requires a complex answer. To get a fairly accurate estimate of how much you need to spend on roof repairs, you need a professional roofing contractor to conduct a thorough examination or inspection of your roof.
Nevertheless, we can still get at least a rough estimate of the overall costs without the help of a professional contractor. An educated guess, after all, can help you prepare in terms of budget. To that end, let’s discuss the essential factors that can impact the overall costs of a roof repair.
Material
The type of material used for the roof is the biggest factor in determining the overall costs of a roof repair. Below is a list showing the industry average cost of each roofing material per 100 square feet.
Asphalt roof: $120 per 100 square feet
Slate roof: $950 per 100 square feet
Tile roof: $300 – $500 per 100 square feet
Metal roof: $1,500 per square feet
Flashing
Flashing is the material — usually made of vinyl, galvanized steel, or aluminum — installed in various places throughout the roof, serving as a barrier to prevent water from seeping into roof openings. Such openings include ones found around vents, skylights, dormers, and chimneys that will otherwise start leaking when it rains.
The costs of a roof flashing repair depend on the complexity and size of the damage, but expect to spend between $50 and $500.
Height and pitch
The accessibility of your roof plays a huge factor in determining the overall costs of roof repairs. The steeper the roof, the higher the cost. Which isn’t surprising due to the higher risks involved. Professional contractors take safety seriously and are predisposed to use the required safety equipment to ensure that they can complete the project without injuries.
A higher pitched roof also makes it difficult for workers to bring their materials to the top, sometimes requiring them to use a winch platform or even a conveyor system. As a general rule, moderately-pitched roofs are cheaper to repair whereas steep roofs are more expensive because fixing them is more complex.
Leak location
Identifying the source of a leak will tell you a great deal on whether the roof can be repaired or needs to be replaced.
Oftentimes, the main source of the leak is not directly above the leak coming from the ceiling. Water follows the path of least resistance, and if it has traveled far, chances are you’ll have to replace the substrate materials between the roof and the ceiling. The technology used for finding the source of a roof leak, such as infrared cameras and moisture meters, also adds to the overall costs.
Design
The simpler the roof design, the cheaper the repair costs will be. One can say that a roof has a “simple” design if it has only a few planes. If your roof has more than six planes, then expect a higher charge for a roof repair.
Moreover, there are other structures that add to a roof’s “complexity,” such as chimneys, skylights, vents, and many others. Since flat roofs don’t have much in the way of detail, they are much cheaper to repair. Fixing a flat roof usually costs between $3 to $10, most of the time involving pooling water or broken seals.
Damaged chimneys, skylights, and vents
Chimneys, skylights, vents, and other rooftop elements can add to the cost of a roofing repair job. The price uptick depends on the severity of the damage incurred by each structure. If the structure needs to be replaced, then expect to pay a hefty amount. Repairing a skylight usually costs between $300 and $500 while chimney repairs often require homeowners to pay between $200 and $500.
Water damage
The thing with water damage is that you might not see the signs until a roofer makes a thorough inspection of the shingles and the decking beneath them. Extensive water damage may require you to replace your roof altogether, thus inflating overall costs.
Repair permits
A roofing contractor may be required to obtain a permit before being authorized to work on your roof. This is to ensure that the city or town will be able to inspect and verify the quality of the work performed. The cost of obtaining a roofing repair permit varies city by city, so don’t forget to check with your local government before finalizing a contract with your roofer.
Getting quotes for your roof repair
In most cases, the best course of action in dealing with a leaking roof is to hire the services of a professional roofing contractor. Roofing jobs are no simple task, not to mention potentially dangerous. As any sensible homeowner will tell you, a roofing system is an investment you’d do well to protect and maximize.
But before you can do that, you need to find a competitive professional roofer who will look out for your interests and charge you reasonable rates.
Where do you even start? And how would you know if a professional contractor is charging you a fair rate? Is the contractor competitive?
We understand the struggle, so what we did is simplify the process of getting FREE quotes from competing contractors in your area. All you need to do is fill out our form and you should get your FREE quotes in no time!