
You probably never imagined that you’ll concern yourself with chimney repairs, but here we are.
While the chimney is often ignored by most homeowners, it’s actually one of the most essential parts of the home.
Because let’s face it: the fireplace is that one cozy corner of the home we can’t live without, especially during cold weather.
Unfortunately, many people forget that the fireplace is only as good as the chimney that houses it.
The moment you realize that your chimney is not working as well as it should, you must take immediate action to have it fixed.
On this page:
- Parts of the Chimney and Their Names
- Signs of a Damaged Chimney and How to Fix Them
- Efflorescence
- Shaling Flue Tiles
- Creosote Buildup
- Cracked or Melted Crown
- Rusted Firebox or Damper
- Spalling Bricks
- Deteriorating Mortar Joints
- Causes of Chimney Damage
- Getting Quotes from Competing Chimney Repair Contractors
After all, a faulty chimney doesn’t only negatively impact your fireplace’s ability to distribute heat, but it also compromises your safety and that of your home.
That said, being proactive trumps being reactive every time. This is even more the case with chimneys. Why? Because most problems with chimneys only become apparent once they’ve gotten worse, costing you more money than if you had the problem diagnosed and fixed at an earlier time.
In fact, the general rule of thumb is to have your chimney inspected and cleaned at least annually.
That doesn’t mean, however, that you must ignore your chimney and fireplace in between those annual inspections.
You need to be always on the lookout for potential problems with your chimney if you want to avoid costly repairs and prolong its lifespan.
That said, Identifying potential problems with your chimney is a lost cause if you’re not knowledgeable about how everything fits together.
Which brings us to…
Parts of the Chimney and Their Names
A chimney is not just a ‘chimney.’ It has many parts that allow it to function as one. If you want to identify potential problems with your chimney, some familiarity of its different parts is needed.
For better recall, let’s split the parts of a chimney into two types: exterior and interior.
Exterior
The exterior of a chimney is not there solely for appearance. It has many essential parts that contribute to the safety and performance of your chimney and fireplace.
Let’s go over the exterior parts of a chimney one by one.
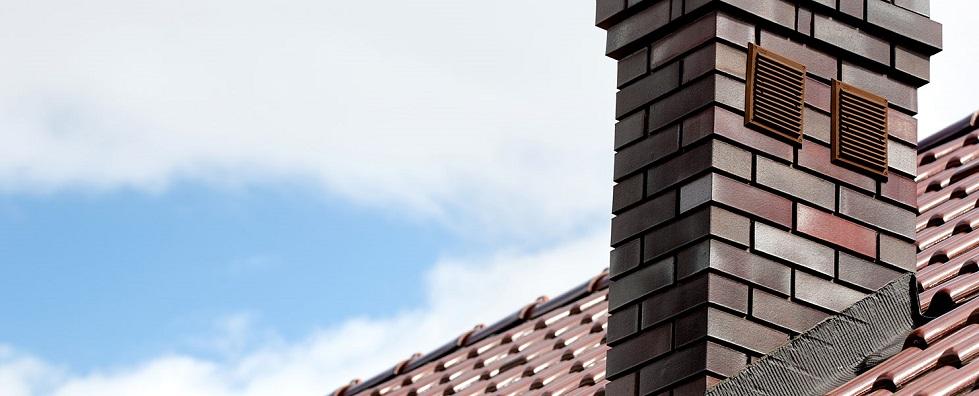
The Bricks
The bricks of a chimney are more than just your chimney’s facade. In fact, they serve a very important purpose. Not only do they provide stability to your chimney’s stack, but they also facilitate the performance and safety of your fireplace.
If your chimney’s bricks are damaged, there’s the risk of the water seeping into the cracks. This is not a problem, at least initially. But it starts being so once the water trapped within freezes and thaws.
This is a process called spalling, and it’s an ugly sight when it happens. However, it doesn’t only cause damage at a superficial level. Allow water to continually damage the chimney’s brick facade and its entire structure will be compromised.
Chimney Cap
The chimney cap is a protective accessory placed on the chimney top, serving as a shield that prevents external elements like rain, snow, debris, and even animals from invading your chimney’s interior. Some chimney caps have wiring around them that serves as a second line of defense against harsher external elements.
Chimney caps also keep hot embers at bay when they rise up from the fireplace, preventing your roof from catching fire in times of intense updrafts.
Chimney Crown
Often mistaken for the chimney cap, the chimney crown is a slab of concrete that covers your chimney’s opening. Its main function is to provide a barrier or mediator between the chimney and the outside air. The crown is typically sloped to prevent water from pooling on the chimney top, thus preventing water from penetrating the chimney system.
Chimney Flashing
The chimney flashing is a protective coating placed in the area between the roof and the chimney, practically preventing moisture from invading the attic or your home’s interior. Water has a knack for squeezing into the corners of your chimney, and installing a chimney flashing should keep them watertight, the same way roof flashing will keep things like the roof vent from leaking.
Interior
The chimney’s interior is not only where the action is. It’s also key to the safe operation of your fireplace. Here are the parts that make up your chimney’s interior.
Chimney Flue
The chimney flue is the passageway through which the smoke and combustion material from the fireplace exit your home. In other words, it’s the inside of your chimney.
Throat Damper
The fireplace and the inside of your chimney are always full of hot air, and you don’t want some of it to enter your home. As such, you need something that can help you control the airflow in and out of the chimney. This is where the throat damper comes in.
When you aren’t using your fireplace, the damper should be kept closed to ensure that the heated or cooled air doesn’t escape. When the fireplace is being used, the throat damper needs to be open so that the smoke and combustible materials can escape up the chimney. The damper also lets in fresh air to help stoke the fire.
Smoke Chamber
The smoke chamber is the area of the chimney between the fireplace firebox and the flue that compresses the smoke and the combustible products so that they can pass through the flue without causing a backdraft. Its walls are sloped for easier passage.
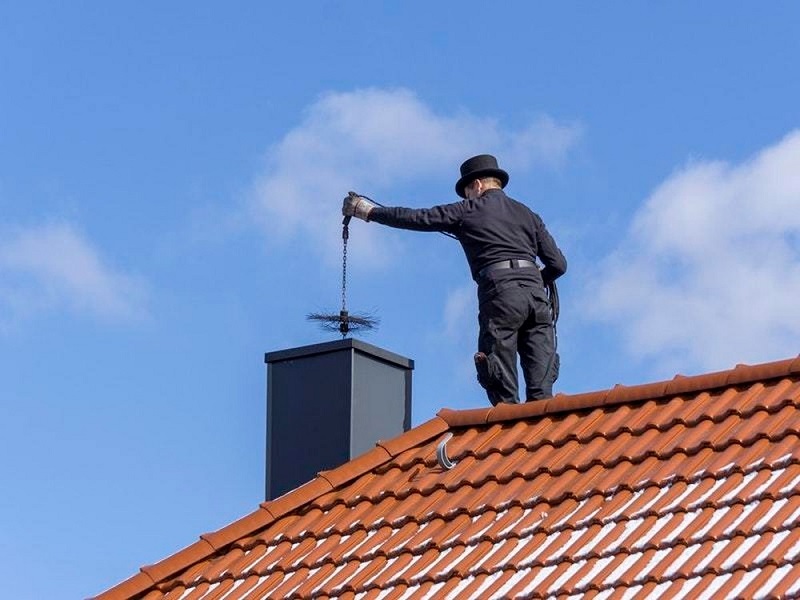
Soot and creosote naturally gather inside the smoke chamber which is why it must be cleaned and inspected regularly.
Chimney Liner
The chimney liner is the material that covers the inside walls of the chimney flue. Its main function is to facilitate the safe and efficient passage of smoke through the flue and out of the chimney’s mouth. It does this by keeping the combustible parts of your home away from high temperatures normally produced in the fireplace and the chimney. A chimney without a liner can be dangerous since there’s always the risk of toxic gasses billowing back into your home.
Signs of a Damaged Chimney and How to Fix Them
The signs of a damaged chimney or fireplace aren’t always obvious, and early detection is key to preventing high repair costs and ensuring their longevity.
Here are the common issues homeowners face with their chimneys, the specific steps on how to fix them, and the costs involved in having them repaired.
Efflorescence
Efflorescence is what happens when white stain settles across your chimney’s brickwork. While the stain itself does not pose much of a problem since it can easily be removed, it’s a telltale sign that your chimney has a moisture problem. As has been explained numerous times in this article, moisture is something you can’t just ignore. Allow all that water to have its way with your chimney’s bricks and it won’t be long until your chimney starts to deteriorate.
How to fix efflorescence
Usually, the rain is enough to wash the white stain away. You can also scrub at it with a stiff-bristled brush along with mild detergent mixed with plain water. Don’t forget to rinse off after cleaning as the trace salts on the surface may re-emerge as new efflorescence.
Here are more effective solutions to removing efflorescence:
- Power washing. This method is effective when it comes to clearing the masonry of surface deposits. Keep the pressure on low to avoid damaging your chimney’s brickwork, which creates a fertile environment for new efflorescence to grow.
- Sandblasting. This method works like a charm if you know how to apply just the right amount of pressure. Do it too hard and the masonry is likely to become more porous, making the surface more inviting to white stains. To avoid this problem, apply sealants on the surface once you’re done.
- Use chemicals. If the white stains on your chimney are being tough customers (as is the case with late-stage efflorescence), then you need to put out all the stops. If all else fails, chemical cleaning should do the work. There are many approved commercial cleaning solutions out there. A cheaper alternative is to use organic acids such as vinegar, citric acid, or tartaric acid.
Average repair costs
The cost of removing efflorescence varies according to the method used. Sandblasting will cost you between $45 to $60 an hour, and that’s not including the cost of materials, which fall around $50. If power washing is involved, expect to pay a contractor a rate of 20 to 30 cents per square foot.
Shaling Flue Tiles
If you start seeing thin slices of chimney tiles in the fireplace, then your flue liners might be cracked. As discussed earlier, flue liners help keep extreme heat away from vulnerable areas from your home. Cracked flue liners are a fire hazard that needs to be addressed.
How to fix shaling flue tiles
If you notice that your flue liners are damaged, the best course of action is to reline the chimney flue altogether. You’d do well to buy a stainless steel chimney liner for better durability, along with the fact that it’s often offered with a lifetime warranty. If the damage to your flue liner is minimal, you can fill the cracks using a flue sealant. This, however, is a temporary solution as sealed flue liners are likely to crack again.
Average repair costs
The repair costs for shaling flue tiles vary according to the material used. The stainless steel liner, for instance, costs around $65 per foot, but factor in labor fees and installation costs and the total would be about $100 per foot.
If your chimney liner is around 26 feet long, then the total repair costs will amount to around $2,600, barring any other overhead costs. A cheaper option would be to use clay instead, which costs $10 per foot.
Creosote Buildup
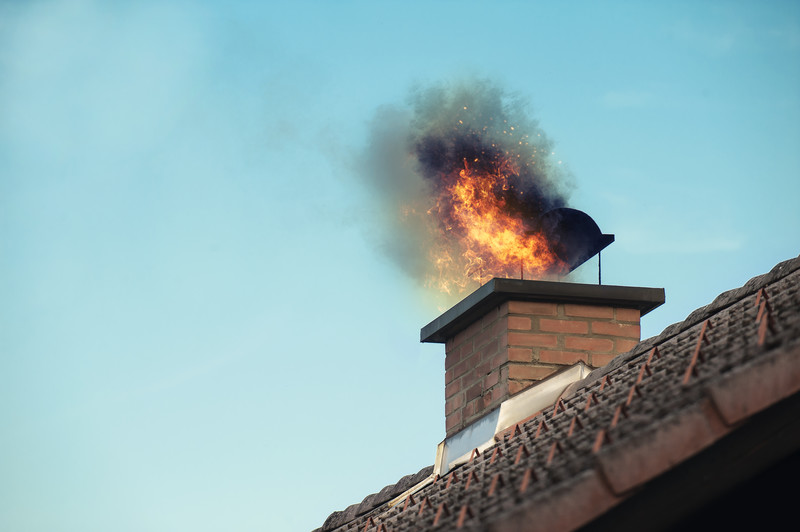
When the fireplace is burning, where does all the wood go? Most of it literally goes up in smoke. But some of it will settle back down and produce a substance called creosote, which eventually settles on the cool chimney flue.
Use the fireplace long enough and the creosote will build up to a point where it becomes a problem. Creosote, if unchecked, can spark chimney fires.
Creosote buildup becomes more pronounced when:
- You’re using wet wood
- Combustion is insufficient
- Cool surfaces
You can minimize creosote buildup by using dry, well-seasoned wood and making sure that the fire is burning briskly. Creosote condensation can also be prevented by ensuring that the flue temperature does not go beyond 250 degrees Fahrenheit.
How to fix creosote buildup
Creosote removal should be performed at least once a year to prevent the residue from piling up. The right treatment depends on the severity of the issue. The most popular method is via chemical treatment, which involves the direct application of a liquid spray or anti-creosote powder onto the fire or the firewood. The resulting updraft causes the chemicals to stick to the creosote, converting it into harmless ash that you can easily remove with a chimney sweep brush.
Average repair costs
A regular chimney sweep will cost you between $150 and $300, depending on the type of chimney you’re using and its condition. Creosote removal, however, requires a higher fee since it requires the use of special chemicals or equipment, not to mention that it involves more demanding work. Each creosote log (log chemically altered to loosen creosote) costs $10 to $20.
Cracked or Melted Crown
The crown is your chimney’s first line of defense against external elements. But once it’s cracked or melted, moisture may seep in and start to wear away at the mortar, widening the cracks even further. Moisture may penetrate the chimney liner as well, resulting in shaling or spalling or both.
How to fix a cracked or melted crown
If the damage is not too severe, all you need to do is fill up the cracks. Simply mix thinset mortar with water to create a mixture (make sure it’s not too lumpy). Scoop the mixture up with a crown sealant and then apply it on the cracks until they’re all filled up. To smoothen the mortar, simply press a thin piece of wood on it.
Another good solution is to caulk up the cracks. Before proceeding, remove residual mortar from the cracks to ensure the smooth application of caulk. Apply the caulk on the cracks and smoothen out the edges with a brush. Make sure that you’re applying the caulk with some good depth. Lastly, wipe away the excess caulk by brushing it away with a wet rag.
Whatever the method used, you’d do well to use elastomeric coating on account of its waterproof qualities. You don’t want to repair your chimney crown only for rainwater to waste all your efforts.
Average repair costs
Small cracks here and there shouldn’t cost much, maybe around $200. If the cracks are large enough that restructuring is required, be ready to shell out around $700.
Rusted Firebox or Damper
If your firebox or damper has been rusted over, that’s a telltale sign that your chimney has a moisture problem. A rusted damper will be more difficult to operate, if at all, creating security issues with your fireplace.
How to fix a rusted firebox or damper
You can clear away the rust off a damper by scrubbing at it with a metal brush vigorously. Rust is toxic so make sure that you wear safety goggles, gloves, and a hat. It’s easy to miss the shady corners so make sure to bring with you a flashlight as well.
Average repair costs
Expect to pay a contractor between $200 to $300 to have your firebox or damper cleaned. The labor cost would vary since the mortar needs to be removed before the rusted damper or firebox can be cleaned.
Spalling Bricks
As already mentioned, spalling happens when moisture penetrates your chimney’s masonry, causing your it to crumble and lose its structural integrity. Make sure to check your brickwork for signs of spalling and address them immediately.
How to repair a spalling chimney
The first order of business in treating a spalling chimney is to address the source of the problem — moisture getting into the masonry. Otherwise, your chimney is going to have a spalling problem again and again.
If the problem persists, a chimney sweep is in order. First, you must check the flue and the masonry thoroughly to determine how the water is getting easy access to the masonry. Once the source of the problem has been detected, the appropriate treatment should be performed.
While treatment varies according to the source of the problem, the stage at which the spalling occurred is often the strongest determinant of the type of treatment that is required.
- Early stage spalling
Early stage spalling usually involves little cracks in the brickwork. To fix such cracks, you only need to restore the brickwork and crown using a waterproofing sealant.
- Late stage spalling
Spalling in the later stages typically involves the severe deterioration of a chimney’s brickwork. In such cases, heavy treatment is almost always required. Count yourself lucky if you only have to replace a few bricks and some mortar joints. If the spalling has come to a point where the chimney’s structure has been drastically compromised, the only choices you have is to rebuild the chimney or install a new one. If it’s the former, the masonry contractor should apply a waterproofing sealant with a cap sealer to ensure reinforced masonry. In most cases, a new chimney cap must be installed.
Average repair costs
The repair costs for spalling masonry depend on the severity of the case. If spalling is in its early stages, be prepared to pay a contractor around $1,000. Spalling in an advanced state may cost you up to $3,000. It’d be much cheaper to do it yourself, however, since the materials needed to fix masonry spalling cost just under $300.
Deteriorating Mortar Joints
Mortar joints keep your brickwork together. If they are cracked, moisture can easily find its way into your chimney’s nooks and crannies, causing further damage. If you want your chimney to maintain its structural integrity and strong foundation, make sure that you repair mortar joints at the first sign of damage.
How to fix deteriorating mortar joints
Repairing deteriorating mortar joints involves two processes called “tuckpoint” or “repoint.” These two processes mostly involve removing the crumbling mortar and then reapplying new mortar into the gaps.
Both of these processes require precision. When performing a repoint, the amount of old mortar that should be removed should have a depth of at least ¾ inches. The new mortar will then be inserted to fill up the remaining ¼ inches. It’s important to use the right type of mortar, and it goes without saying that the new mortar should match the original one.
Average repair costs
If you’re dealing with only a few small cracks, the cost of repair would fall around $175. Severe cases, however, will require a rebuilding of the chimney’s entire facade and sidings, which would cost up to $3,000 to repair.
Causes of Chimney Damage
Wear and Tear
Chimneys, like any other home fixture, has a limited lifespan. In fact, chimneys and flue liners can last from 20 to 40 years. Eventually, your chimney is going to succumb to wear and tear, and you’d do well to make the necessary repairs to prolong its shelf-life.
Chimneys, as expected, are always exposed to outside elements. The chimney cap, in particular, regularly falls prey to rust. Which is not surprising considering that the rain and snow are its regular bedfellows. Birds and bats and other animals often try to break through the chimney cap as well.
Chimneys constructed out of block, stone, or brick are susceptible to cracks, chips, and dents. If you want masonry that is longer-lasting, installing stucco over your chimney is the best course of action.
Metal flue liners, while durable, can get rusted out when exposed to moisture and may warp when subjected to frequent heating and cooling changes.
Natural Disasters and Accidents
All of us eventually fall victim to unforeseen events and it’s up to us how effectively we can weather the storm, so to speak. Chimney fires, while preventable, can strike without your knowledge.
Chimneys, by virtue of their position on the rooftop, often fall prey to lightning strikes. It’s not uncommon to see broken bricks on the ground following a heavy storm. Chimneys that are in close proximity to large trees are also at risk to falling branches. Strong winds can dislodge or whisk away chimney caps, loosen up flashing, and even cause bricks to crack. Also, heavy rainfall can result in a leaky chimney and water damage. And as you already know by this point, water damage often leads to the deterioration of your chimney’s structure as well as mold infestation.
Hidden Dangers
Your chimney may be looking spry and stable, but that doesn’t mean that there’s nothing wrong with it. After all, not many of us would look forward to taking a peek at the inside of a chimney.
For instance, it’s not always apparent if a chimney has a damaged flue liner. The buildup of creosote can spark a chimney fire. Obstructions inside the chimney can close up vents, blocking smoke and fumes until they fill up the room.
Poor craftsmanship
This may count as another hidden danger but we feel that this deserves a separate section. The thing with poor craftsmanship is that it’s difficult to detect if you aren’t an expert with chimneys, which is the case with many homeowners.
Poor craftsmanship can mean a lot of things. Maybe someone flipped a switch too late at the factory while mixing the mortar that would connect your masonry, resulting in mortar joints that crumble easily. Measurement errors might have caused a chimney cap or the flue liner to have the wrong size. The damper might become inoperable due to a loose spring.
The point? Many things can go wrong during the construction process, so make sure to buy materials from reputable manufacturers or suppliers.
Moisture
This part shouldn’t come as a surprise anymore. To say that moisture is your chimney’s arch-nemesis is not overreaching. In fact, most chimney problems can be traced to moisture issues. Once moisture leaks into the chimney, it can cause a wide range of issues, including rust buildup, cracked flue liners, mold infestation, structural issues, and more. And it’s also fair to say that most maintenance activities involve the process of keeping moisture at bay.
Getting Quotes from Competing Chimney Repair Contractors
Let me guess: Your chimney is still in a state of disrepair and you want a chimney repair contractor with the knowledge and experience needed to fix it once and for all. Maybe winter’s just around the corner and you want a stable chimney that will keep you and your family warm all throughout the cold season.
But there’s a problem. You don’t know where to find one. Or maybe you do but you aren’t too confident about finding a contractor who is competent enough to do the job right. Also, what if you get overcharged?
There’s just too much at risk. Too much to lose.
We understand the struggle all too well. Finding a good contractor is like finding a needle in a haystack.
So, here’s a bit of free advice: Get as many quotes as you can.
When you have a handful of itemized quotes to choose from, you’re putting yourself in a better position to choose a contractor who can understand and address your needs.
Granted, getting quotes requires time and money (some contractors charge for quotes), but that’s time and money that will pay dividends in the end.
With that said, we’re also offering a much better solution.
You see, what we did is gather data on the most competitive contractors in the U.S. We put them all in our database, which we manage and update on a regular basis.
In other words, the chimney repair contractor you’re looking for, one who will provide you with exemplary service and charge you a fair rate, is more than likely listed in that database. And we can give you all the information you need to get hold of that contractor.
All you need to do is fill out the form on this page and you can receive up to four quotes from competing contractors. Here’s the best part: it’s completely free!
Also, there’s no commitment required. If none of the quotes you receive is to your liking, you are well within your right not to hire any of the contractors.
So, are you ready to put your chimney woes to rest?